 0
0
 1
1
Why This Blog
Snowflake CI/CD with Azure DevOps: Deploying Snowflake objects by hand i.e pasting DDL into Snowsight, running it in DEV, running it again in PROD works until it doesn’t. It’s manual, un-audited, and error-prone. The moment two team members touch the same object, or PROD drifts silently from DEV, the cracks show.
CI/CD fixes this. The idea is simple: SQL objects live in Git, and a pipeline is the only thing that writes to Snowflake. Every change is versioned, reviewed, and traceable. There’s a formal approval before anything hits PROD, and rollback is a git revert away.
This blog is a step-by-step walkthrough of building that pipeline using Azure DevOps and Snowflake, aimed at Snowflake practitioners new to Azure DevOps. It covers the full setup — Snowflake service user, RSA key-pair authentication, Azure Repos, variable groups, environments, approval gates, and the pipeline YAML — with every SQL statement, command, and screenshot needed to reproduce it end-to-end.
By the end of this walkthrough you will have a working pipeline that:
- Triggers on
git pushtomain - Deploys tables, views, and procedures to a DEV schema automatically
- Pauses for human approval before touching PROD
- Uses RSA key-pair authentication — no stored passwords
Architecture
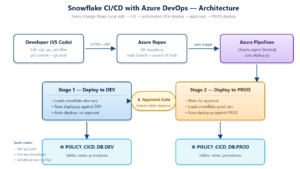
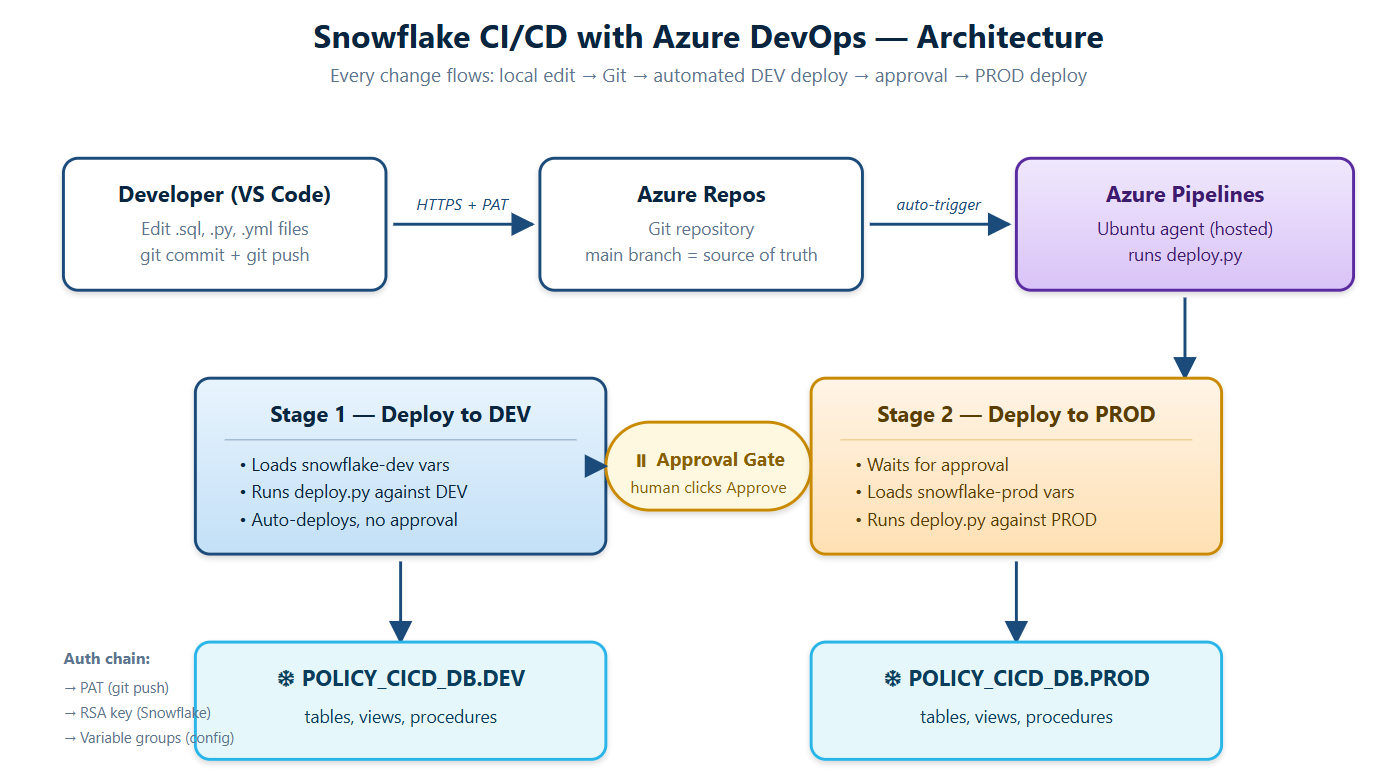
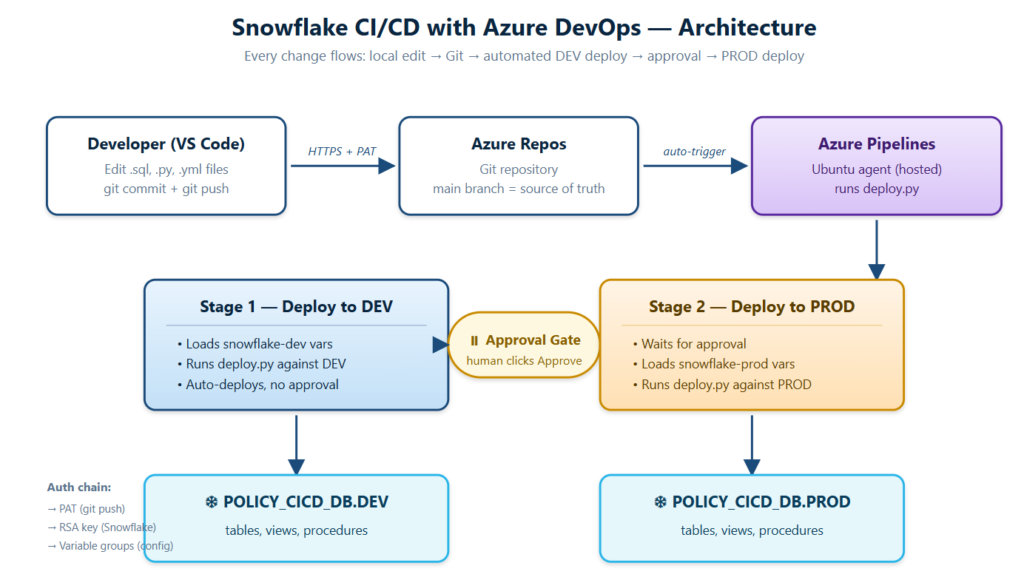
Every change flows through the same predictable path: developer edits a SQL file locally, commits and pushes to Azure Repos, the pipeline auto-triggers and deploys to DEV, then pauses for human approval before deploying to PROD.
Use case: auto policy renewal analytics — a small star schema (FACT_POLICY_RENEWAL, DIM_POLICY, DIM_AGENT), a reporting view (VW_RENEWAL_SUMMARY), and a stored procedure (SP_SCORE_RENEWAL_RISK) that scores renewal risk. Structurally rich enough to expose deployment ordering issues; small enough to reason about.
Phase 1 — Azure DevOps Setup
Create the Organization and Project
Sign in to Azure DevOps at https://aex.dev.azure.com/me. Note that this is not the Azure Portal — Azure DevOps is a separate product for repos and pipelines.
1. Click into your organization
Once signed in, click your organization link. The URL becomes dev.azure.com/<your-org>/.
2. Create the new project
Top-right → + New project → fill in:
| Field | Value |
|---|---|
| Project name | snowflake-policy-cicd |
| Description | Policy renewal CI/CD hands-on |
| Visibility | Private |
3. Generate the Personal Access Token (PAT)
You need a PAT to push code from your laptop to Azure Repos over HTTPS. Your Microsoft account password cannot be used for git operations directly.
- Top-right in DevOps → user icon → Personal access tokens
- + New Token
- Name:
git-push-cicd, Expiration: 90 days - Scopes: Custom defined → Code → Read & write only
- Create → copy the token immediately (shown only once)
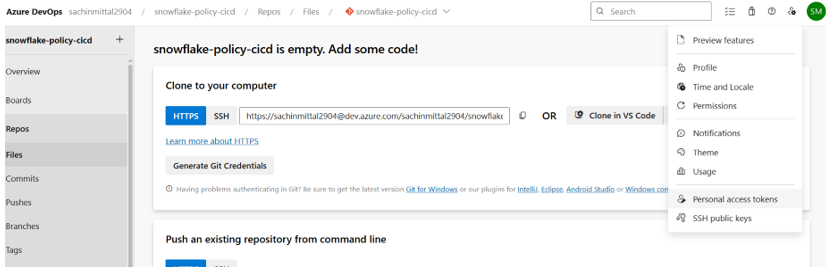
Why Azure DevOps Needs Its Own PAT
Your Microsoft account can sign into the DevOps website with browser + password + 2FA. That works for clicking around the UI.
But git is a command-line protocol. When you run git push, there’s no browser, no 2FA popup — it’s just a raw HTTPS request that needs a username and password. Microsoft doesn’t allow your actual account password over this channel (it never expires, has full account access, can’t be revoked without changing everything).
The PAT is a token that behaves like a password but is limited:
- Scoped — Code (Read & Write) only, nothing else
- Time-bound — expires after 90 days
- Revocable — kill it any time without touching your Microsoft account
Phase 2 — Local Setup in VS Code
Create the Project Folder
- Create a folder called
snowflake-policy-cicd - In VS Code: File → Open Folder → select the folder above
- Open the integrated terminal — make sure it’s Git Bash (not PowerShell)
Folder structure
mkdir -p sql/tables sql/views sql/procedures
touch sql/tables/.gitkeep sql/views/.gitkeep sql/procedures/.gitkeep
.gitignore — critical for secret hygiene
Create a .gitignore file at repo root so private keys never get committed:
*.p8
*.pub
*_b64.txt
*.pyc
.venv/
.env
.DS_Store
Initialize Git and Push to Azure Repos
git init
git add .
git commit -m "chore: initial repo skeleton"

git remote add origin https://sachinmittal2904@dev.azure.com/sachinmittal2904/snowflake-policy-cicd/_git/snowflake-policy-cicd
git branch -M main
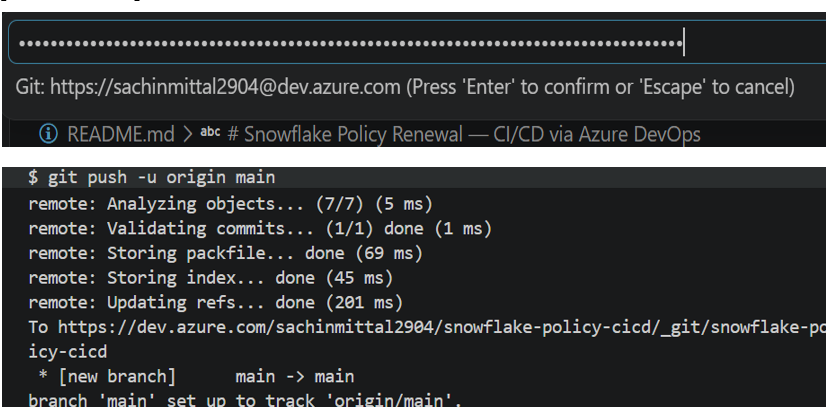
git push -u origin main
On git push, VS Code intercepts the credential prompt at the top of the window. Paste your PAT there (not your Microsoft password) and press Enter.
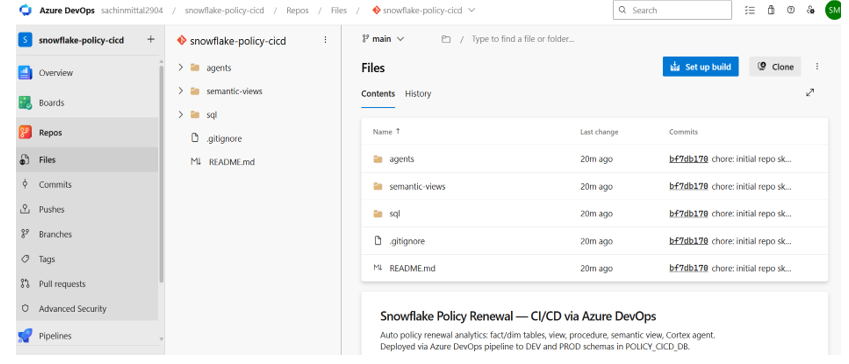
Verify
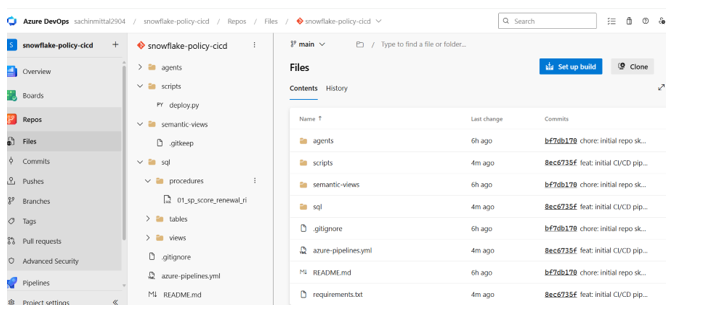
Refresh Azure DevOps → Repos → Files. You should see your folder skeleton and README.md.
Phase 3 — Snowflake Setup
Generate the RSA Key Pair
The pipeline authenticates to Snowflake using an RSA private key — safer than a password and industry standard. Create the key pair outside your git repo so it never gets accidentally committed.
Recommended location: C:\Centric\Snowflake\snowflake-policy-cicd_keypair
In Git Bash (from your keypair folder):
openssl genrsa 2048 | openssl pkcs8 -topk8 -inform PEM -out rsa_key.p8 -nocrypt
openssl rsa -in rsa_key.p8 -pubout -out rsa_key.pub
cat rsa_key.p8 | base64 | tr -d '\n' > rsa_key_b64.txt
This produces three files:
rsa_key.p8— private key (stays local, never share)rsa_key.pub— public key (goes onto the Snowflake user)rsa_key_b64.txt— base64-encoded private key (goes into Azure DevOps as a secret)
Snowflake Objects and Service User
Run everything below as ACCOUNTADMIN in Snowsight. This creates the database, warehouse, service user, deploy role, and grants:
USE ROLE ACCOUNTADMIN;

CREATE DATABASE IF NOT EXISTS POLICY_CICD_DB;
CREATE SCHEMA   IF NOT EXISTS POLICY_CICD_DB.DEV;
CREATE SCHEMA   IF NOT EXISTS POLICY_CICD_DB.PROD;

CREATE WAREHOUSE IF NOT EXISTS CICD_WH
  WAREHOUSE_SIZE = XSMALL
  AUTO_SUSPEND   = 60
  AUTO_RESUME    = TRUE;

CREATE ROLE IF NOT EXISTS CICD_DEPLOY_ROLE;

GRANT USAGE ON DATABASE POLICY_CICD_DB       TO ROLE CICD_DEPLOY_ROLE;
GRANT USAGE ON SCHEMA   POLICY_CICD_DB.DEV   TO ROLE CICD_DEPLOY_ROLE;
GRANT USAGE ON SCHEMA   POLICY_CICD_DB.PROD  TO ROLE CICD_DEPLOY_ROLE;
GRANT USAGE ON WAREHOUSE CICD_WH             TO ROLE CICD_DEPLOY_ROLE;

GRANT CREATE TABLE, CREATE VIEW, CREATE PROCEDURE
  ON SCHEMA POLICY_CICD_DB.DEV  TO ROLE CICD_DEPLOY_ROLE;
GRANT CREATE TABLE, CREATE VIEW, CREATE PROCEDURE
  ON SCHEMA POLICY_CICD_DB.PROD TO ROLE CICD_DEPLOY_ROLE;

CREATE USER IF NOT EXISTS CICD_DEPLOYER
  TYPE              = SERVICE
  DEFAULT_ROLE      = CICD_DEPLOY_ROLE
  DEFAULT_WAREHOUSE = CICD_WH;

GRANT ROLE CICD_DEPLOY_ROLE TO USER CICD_DEPLOYER;
Attach the public key to the service user
USE ROLE ACCOUNTADMIN;
ALTER USER CICD_DEPLOYER SET RSA_PUBLIC_KEY = '<paste single-line key body here>';
DESC USER CICD_DEPLOYER;
Phase 4 — Variable Groups, Environments, Approval Gates
Before clicking anything, understand what you’re building and why. Our pipeline will run a Python script that connects to Snowflake. That script needs to know:
- Which Snowflake account and user to connect as
- The private key for authentication
- Which database, schema, warehouse, and role to deploy to
We can’t hardcode these into the script — because the same script must deploy to DEV in one stage and PROD in another. And we can’t commit secrets to Git.
Azure DevOps solves this with three concepts:
Concept 1 — Variable Group
A named bucket of key-value pairs stored in DevOps. At pipeline runtime, all values in the group get injected as environment variables the Python script can read via os.environ[]. We create three groups:
| Group name | Purpose | Used by |
|---|---|---|
snowflake-credentials |
Shared auth (account, user, private key) | All stages |
snowflake-dev |
DEV-specific (SF_SCHEMA=DEV) | DEV stage |
snowflake-prod |
PROD-specific (SF_SCHEMA=PROD) | PROD stage |
Same pipeline, same Python code — but by swapping which variable group is attached to each stage, we deploy to different Snowflake schemas. That’s the whole trick.
Concept 2 — Secret Variable
Inside a variable group, any variable can be marked as secret (padlock icon). Effects:
- Value is encrypted at rest
- Value is masked as
***in pipeline logs - Once saved as secret, you can only overwrite, never view
Only SNOWFLAKE_PRIVATE_KEY_RAW needs the padlock. Everything else is public config.
Concept 3 — Environment
A named deployment target in DevOps (dev, prod). The pipeline YAML links each deploy stage to an environment. Environments give us:
- Deployment history — visual list of every deploy
- Approval gates — attach a “human must click Approve” check to any environment
For our setup:
devenvironment — no approval, deploys automaticallyprodenvironment — requires one approver before deployment
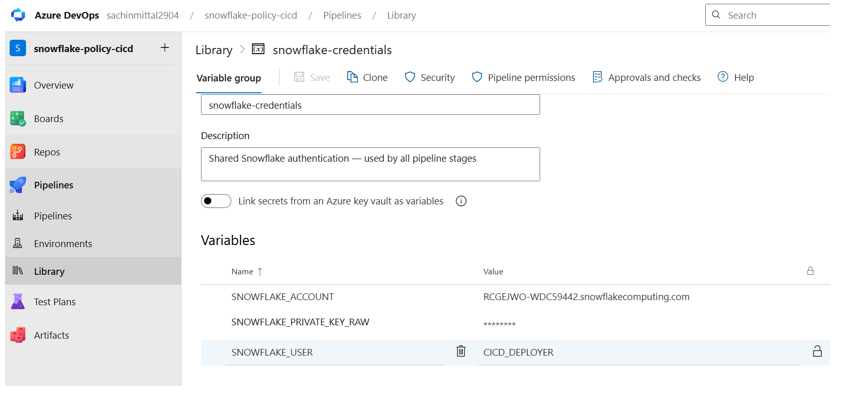
Create Variable Group: snowflake-credentials
- DevOps project → left sidebar → Pipelines (rocket icon) → Library
- Top → + Variable group
- Name:
snowflake-credentials - Allow access to all pipelines: OFF (we authorize per-pipeline on first run)
- Link secrets from Azure Key Vault: OFF
Add three variables:
| Name | Value | Padlock? |
|---|---|---|
SNOWFLAKE_ACCOUNT |
<your account identifier> | No |
SNOWFLAKE_USER |
CICD_DEPLOYER |
No |
SNOWFLAKE_PRIVATE_KEY_RAW |
paste rsa_key_b64.txt content |
YES — click padlock |
How to paste the private key value:
- Open
rsa_key_b64.txtin VS Code → Ctrl+A → Ctrl+C - In DevOps, click into the value cell for
SNOWFLAKE_PRIVATE_KEY_RAW→ Ctrl+V - Click the padlock icon on that row BEFORE saving
- Value box changes to
***— correct
Create Variable Group: snowflake-dev
Same flow. Name: snowflake-dev. Add four variables, all non-secret:
SF_DATABASE   = POLICY_CICD_DB
SF_SCHEMA     = DEV
SF_WAREHOUSE  = CICD_WH
SF_ROLE       = CICD_DEPLOY_ROLE
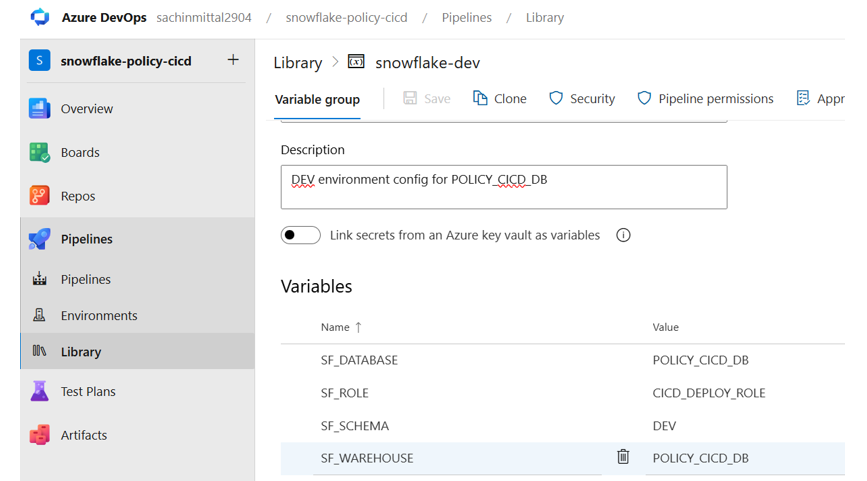
Create Variable Group: snowflake-prod
Same keys, only SF_SCHEMA changes to PROD:
SF_DATABASE   = POLICY_CICD_DB
SF_SCHEMA     = PROD
SF_WAREHOUSE  = CICD_WH
SF_ROLE       = CICD_DEPLOY_ROLE
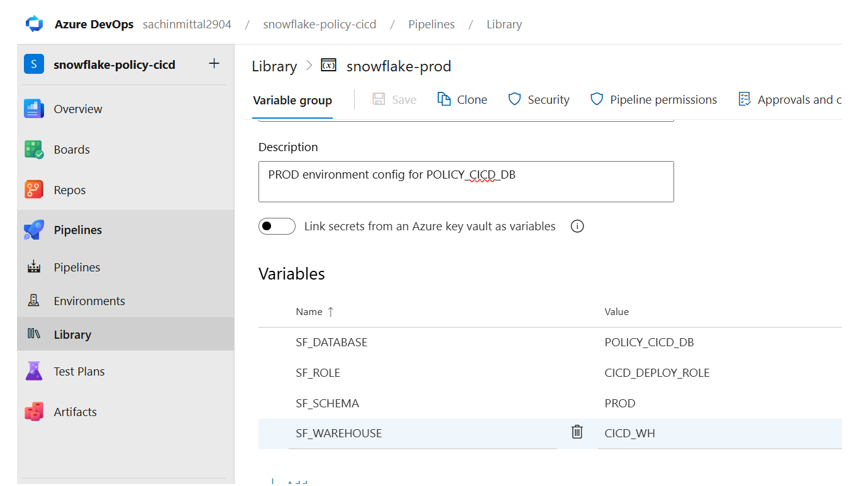
Create Two Environments: dev and prod
- Left sidebar → Pipelines → Environments
- Top-right → New environment
- Name:
dev(repeat forprod) - Resource: None (Snowflake is external, not a k8s cluster or VM)
- Create
Environments page now shows two tiles: dev and prod.
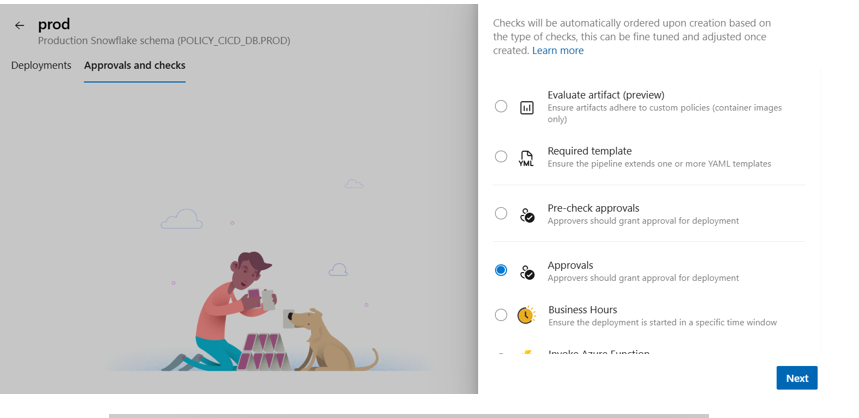
Add Approval Gate on prod
This is the safety net — pipeline pauses at PROD stage until a human clicks Approve.
- Click into the
prodenvironment - Three-dot menu (⋯) → Approvals and checks
- + Add check → Approvals → Next
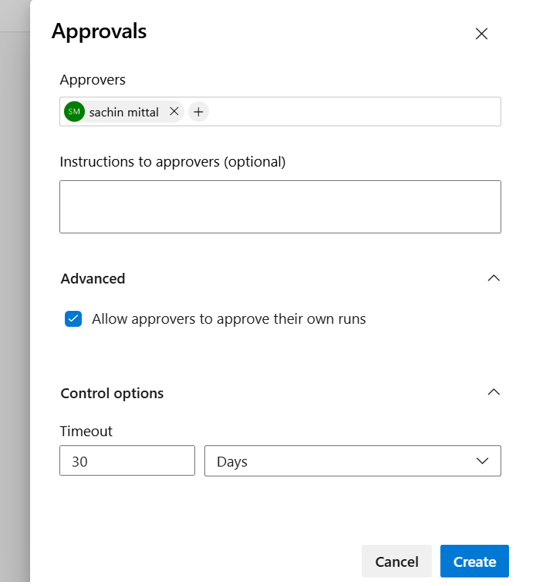
- Approvers: add yourself
- Minimum approvers: 1, Timeout: 30 days
- Advanced → Allow approvers to approve their own runs: ON (for solo learning)
- Create
Phase 5 — Build the Pipeline (Code, YAML, First Run)
Snowflake SQL Files
Every Snowflake object we want in DEV and PROD gets a .sql file in the repo. The pipeline reads these files and executes them. Same file, deployed to different schemas by parameterizing ${DATABASE} and ${SCHEMA}.
Repo layout after this step:
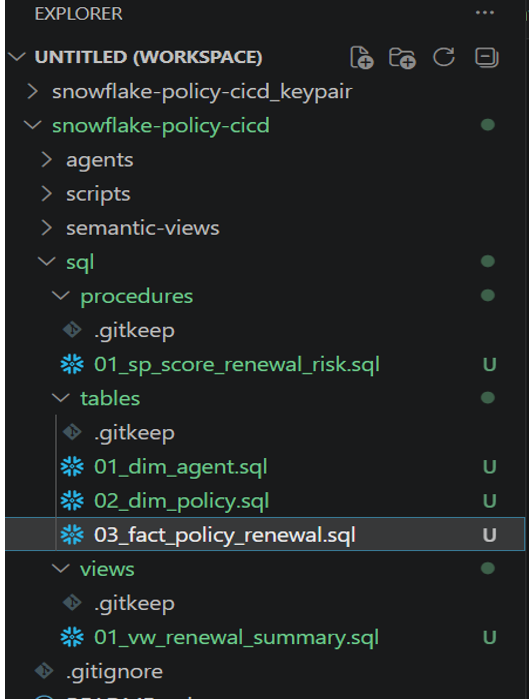
Numeric prefixes (01_, 02_, 03_) control deploy order within each folder — tables must exist before the view can reference them.
sql/tables/01_dim_agent.sql
CREATE OR REPLACE TABLE ${DATABASE}.${SCHEMA}.DIM_AGENT (
    AGENT_ID    VARCHAR(10)  NOT NULL,
    AGENT_NAME  VARCHAR(100) NOT NULL,
    REGION      VARCHAR(50),
    CONSTRAINT PK_DIM_AGENT PRIMARY KEY (AGENT_ID)
);
sql/tables/02_dim_policy.sql
CREATE OR REPLACE TABLE ${DATABASE}.${SCHEMA}.DIM_POLICY (
    POLICY_ID      VARCHAR(15) NOT NULL,
    POLICY_TYPE    VARCHAR(30),
    VEHICLE_CLASS  VARCHAR(20),
    ISSUE_DATE     DATE,
    AGENT_ID       VARCHAR(10),
    CONSTRAINT PK_DIM_POLICY PRIMARY KEY (POLICY_ID)
);
sql/tables/03_fact_policy_renewal.sql
CREATE OR REPLACE TABLE ${DATABASE}.${SCHEMA}.FACT_POLICY_RENEWAL (
    RENEWAL_ID       VARCHAR(20) NOT NULL,
    POLICY_ID        VARCHAR(15) NOT NULL,
    RENEWAL_DATE     DATE,
    PREMIUM_AMOUNT   NUMBER(12,2),
    CLAIMS_LAST_YEAR NUMBER(4,0),
    RENEWAL_STATUS   VARCHAR(20),
    CONSTRAINT PK_FACT_POLICY_RENEWAL PRIMARY KEY (RENEWAL_ID)
);
sql/views/01_vw_renewal_summary.sql
CREATE OR REPLACE VIEW ${DATABASE}.${SCHEMA}.VW_RENEWAL_SUMMARY AS
SELECT
    f.RENEWAL_ID, f.RENEWAL_DATE, f.RENEWAL_STATUS,
    f.PREMIUM_AMOUNT, f.CLAIMS_LAST_YEAR,
    p.POLICY_ID, p.POLICY_TYPE, p.VEHICLE_CLASS, p.ISSUE_DATE,
    a.AGENT_ID, a.AGENT_NAME, a.REGION
FROM ${DATABASE}.${SCHEMA}.FACT_POLICY_RENEWAL f
JOIN ${DATABASE}.${SCHEMA}.DIM_POLICY p ON f.POLICY_ID = p.POLICY_ID
JOIN ${DATABASE}.${SCHEMA}.DIM_AGENT  a ON p.AGENT_ID  = a.AGENT_ID;
sql/procedures/01_sp_score_renewal_risk.sql
CREATE OR REPLACE PROCEDURE ${DATABASE}.${SCHEMA}.SP_SCORE_RENEWAL_RISK(
    P_POLICY_ID VARCHAR
)
RETURNS NUMBER(5,2)
LANGUAGE SQL
AS
$$
DECLARE
    v_claims       NUMBER := 0;
    v_lapse_count  NUMBER := 0;
    v_score        NUMBER := 0;
BEGIN
    SELECT COALESCE(MAX(CLAIMS_LAST_YEAR), 0) INTO :v_claims
      FROM FACT_POLICY_RENEWAL WHERE POLICY_ID = :P_POLICY_ID;

    SELECT COUNT(*) INTO :v_lapse_count
      FROM FACT_POLICY_RENEWAL
     WHERE POLICY_ID = :P_POLICY_ID AND RENEWAL_STATUS = 'LAPSED';

    v_score := LEAST(100, (v_claims * 20) + (v_lapse_count * 40));
    RETURN v_score;
END;
$$;
Python Deploy Script
A single Python script the pipeline invokes. It connects to Snowflake using the RSA key (base64-decoded from the secret variable), walks the sql/ subfolders in order, and executes each .sql file against ${DATABASE}.${SCHEMA}.
Same script runs for DEV and PROD — the difference is which variable group the pipeline injects.
requirements.txt (at repo root)
snowflake-connector-python>=3.12,<4
cryptography>=42
scripts/deploy.py
"""
Snowflake CI/CD deploy script.
Reads SQL files from sql/{tables,views,procedures} in order,
substitutes ${DATABASE} and ${SCHEMA}, and executes against Snowflake.
"""
import os, sys, glob, base64
from cryptography.hazmat.primitives import serialization
from cryptography.hazmat.backends import default_backend
import snowflake.connector

DEPLOY_FOLDERS = ["sql/tables", "sql/views", "sql/procedures"]

def get_private_key_bytes():
    raw = os.environ["SNOWFLAKE_PRIVATE_KEY_RAW"]
    if not raw.startswith("-----"):
        raw = base64.b64decode(raw).decode("utf-8")
    pk = serialization.load_pem_private_key(
        raw.encode(), password=None, backend=default_backend())
    return pk.private_bytes(
        encoding=serialization.Encoding.DER,
        format=serialization.PrivateFormat.PKCS8,
        encryption_algorithm=serialization.NoEncryption(),
    )

def get_connection():
    return snowflake.connector.connect(
        account   = os.environ["SNOWFLAKE_ACCOUNT"],
        user      = os.environ["SNOWFLAKE_USER"],
        private_key = get_private_key_bytes(),
        warehouse = os.environ["SF_WAREHOUSE"],
        role      = os.environ["SF_ROLE"],
        database  = os.environ["SF_DATABASE"],
        schema    = os.environ["SF_SCHEMA"],
    )

def read_and_substitute(path, database, schema):
    with open(path, "r", encoding="utf-8") as f:
        content = f.read()
    return content.replace("${DATABASE}", database).replace("${SCHEMA}", schema)

def deploy_folder(conn, folder, database, schema):
    files = sorted(glob.glob(os.path.join(folder, "*.sql")))
    if not files:
        return 0
    cur = conn.cursor()
    try:
        for f in files:
            print(f"  Deploying: {f}")
            sql = read_and_substitute(f, database, schema)
            for result in cur.connection.execute_string(sql):
                for row in result:
                    print(f"    -> {row[0]}")
    finally:
        cur.close()
    return len(files)

def main():
    database, schema = os.environ["SF_DATABASE"], os.environ["SF_SCHEMA"]
    print(f"Deploying to {database}.{schema}")
    conn = get_connection()
    try:
        total = 0
        for folder in DEPLOY_FOLDERS:
            total += deploy_folder(conn, folder, database, schema)
        print(f"SUCCESS. {total} files deployed.")
    except Exception as e:
        print(f"FAILED: {e}", file=sys.stderr)
        sys.exit(1)
    finally:
        conn.close()

if __name__ == "__main__":
    main()
Azure Pipeline YAML
The azure-pipelines.yml at repo root defines two stages: DEV (auto-deploys) and PROD (gated by the approval you set up).
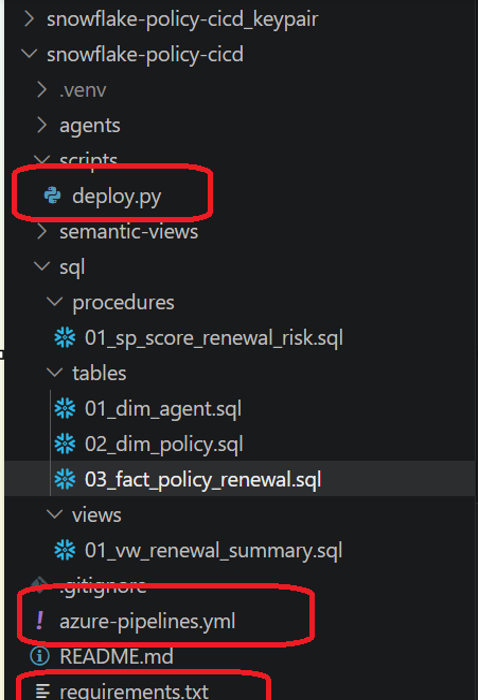
Key structural details
deployment:notjob:— deployment jobs are the only kind that integrate with environments and approval gatesvariables.groupper stage — this is what makes one script deploy to two schemas- Same
env:block in both stages, wiring pipeline variables to Python environment
Commit and Push
cd /c/Centric/Snowflake/snowflake-policy-cicd

git status               # verify you see the new/changed files
git add .
git commit -m "feat: initial CI/CD pipeline for tables, views, procedures"
git push
Create the Pipeline in Azure DevOps
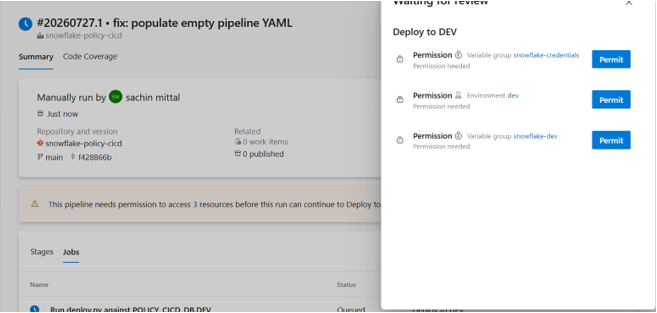
Pushing the YAML file is not enough — DevOps needs to know that this specific YAML file is your pipeline. One-time setup:
- Azure DevOps → Pipelines → Pipelines → New pipeline
- Where is your code? → Azure Repos Git
- Select repository →
snowflake-policy-cicd - Configure → Existing Azure Pipelines YAML file
- Branch:
main, Path:/azure-pipelines.yml→ Continue - YAML preview shows → dropdown next to Run → Save (don’t run yet)
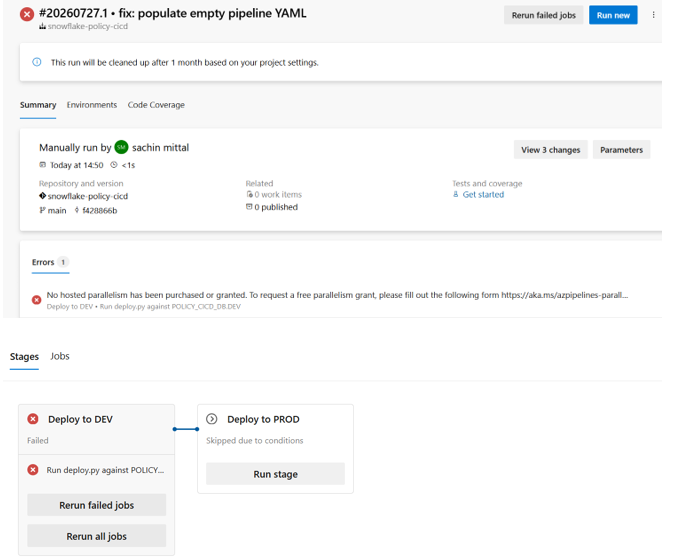
Phase 6 — Hosted Parallelism (First-Run Gotcha)
What Hosted Parallelism Means
Microsoft-hosted agents (the free Ubuntu/Windows VMs that run your pipeline) require a one-time approval before an organization can use them. Since April 2021, new DevOps orgs are gated behind a manual review to prevent abuse.
You will hit this error on your first run:
No hosted parallelism has been purchased or granted.
To request a free parallelism grant, please fill out the following form:
https://aka.ms/azpipelines-parallelism-request
Request the Free Grant
Fill out Microsoft’s form at https://aka.ms/azpipelines-parallelism-request. Turnaround: 1–3 business days. Once granted: 1800 free minutes per month, forever.
| Field | Value |
|---|---|
| Organization | your DevOps org name |
| Contact email | your account email |
| Type of parallelism | Microsoft-hosted |
| Number of parallel jobs | 1 |
| Justification | Personal learning, single job sufficient, no commercial use |
What You Can Do While Waiting
The pipeline is blocked, but nothing else is. You can run deploy.py locally with the same environment variables. Same result, just runs on your laptop instead of Microsoft cloud.
cd /c/Centric/Snowflake/snowflake-policy-cicd
source .venv/Scripts/activate

# Deploy to DEV locally
export SF_SCHEMA=DEV
python scripts/deploy.py

# Deploy to PROD locally (approve mentally first)
export SF_SCHEMA=PROD
python scripts/deploy.py
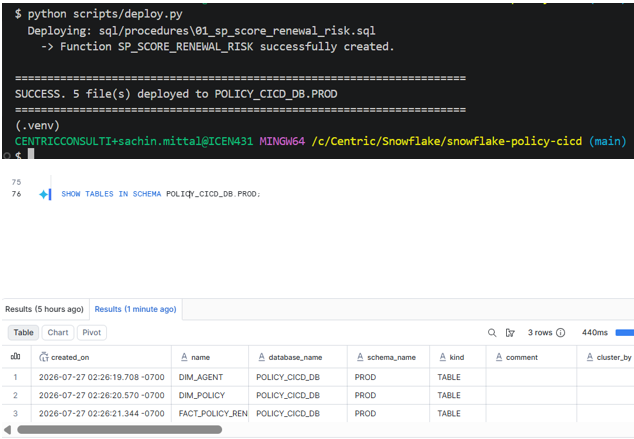
Local vs Pipeline — Understanding the Flow
One subtlety worth spelling out: when you run the deploy locally versus through the pipeline, the ordering of commit vs deploy is opposite.
Local simulation (used while waiting for parallelism grant)
edit SQL → save → deploy.py DEV → verify DEV → deploy.py PROD → verify PROD → git commit → git push
Why commit last: you are running deploy.py from your working folder. The script reads the file straight from disk — commit or no commit does not affect the deploy. Git is just your notebook to record “this happened.”
Real pipeline (once parallelism is granted)
edit SQL → save → git commit → git push → pipeline auto-triggers → deploys DEV → approve → deploys PROD
Why commit first: Azure DevOps has zero access to your laptop. It reads what is in main branch. If you have not pushed, the pipeline sees nothing new.
The key concept: Local deploy.py reads from your working folder. Pipeline deploy.py reads from whatever is in main. Same script, different starting point.
What You Now Have
At the end of this walkthrough you have:
- A repository where Snowflake objects are versioned like code
- A pipeline that auto-deploys DEV on every push to
main - A human approval gate before anything hits PROD
- Zero secrets in Git — private key stored encrypted in DevOps
- A blueprint you can extend to semantic views, Cortex agents, and more
The Uncomfortable Truth About CREATE OR REPLACE
Every SQL file above uses CREATE OR REPLACE TABLE. On every pipeline run, the table is dropped and recreated — all data wiped. For DEV where you insert test rows after each deploy, fine. For PROD with real data, this is a data-loss bug waiting to happen.
The real solution is incremental migrations — tools like Schemachange (from Snowflake Labs) or Flyway. Instead of one file per table that always runs, you write versioned migration files:
migrations/
├── V1.0.0__create_dim_policy.sql
├── V1.1.0__add_customer_email_to_dim_policy.sql    -- ALTER TABLE
└── V1.2.0__add_index_on_policy_id.sql
Each migration runs once. Schemachange tracks state in a CHANGE_HISTORY table inside Snowflake. Data is preserved. Rollbacks are traceable. That is the topic of the next post in this series.
What Is Next
- Making Snowflake CI/CD production-safe with Schemachange — incremental migrations instead of CREATE OR REPLACE