Smart Insurance Claim Photo Triage System: Imagine an insurance adjuster’s morning. There are 200 new auto claims in the queue. Each one comes with 5–10 damage photos. Before any real work can begin, someone has to:
- Look at every photo and decide if it’s even a usable claim image
- Identify which parts are damaged for the repair estimate
- Write a summary for the claim file
- Check for fraud signals — has this photo been submitted before?
Manual triage is slow, inconsistent, and expensive.What if all of this could happen automatically the moment a photo lands in Snowflake — with no Python ML pipelines, no GPU servers, no external API calls?
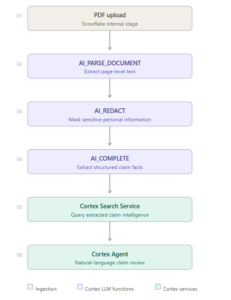
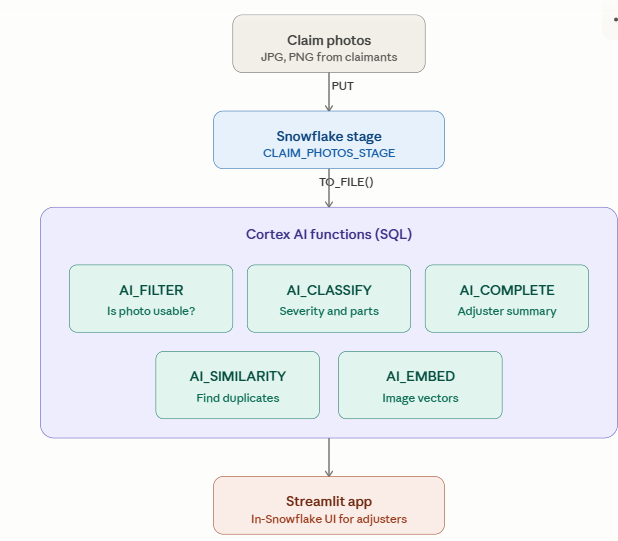
That’s exactly what we’ll build today. A complete AI-powered claim photo triage system using five Snowflake Cortex AI functions, wrapped in a Streamlit-in-Snowflake app that any adjuster can use without touching a line of code.
The AI Functions We’ll Use
The AI Functions We’ll Use
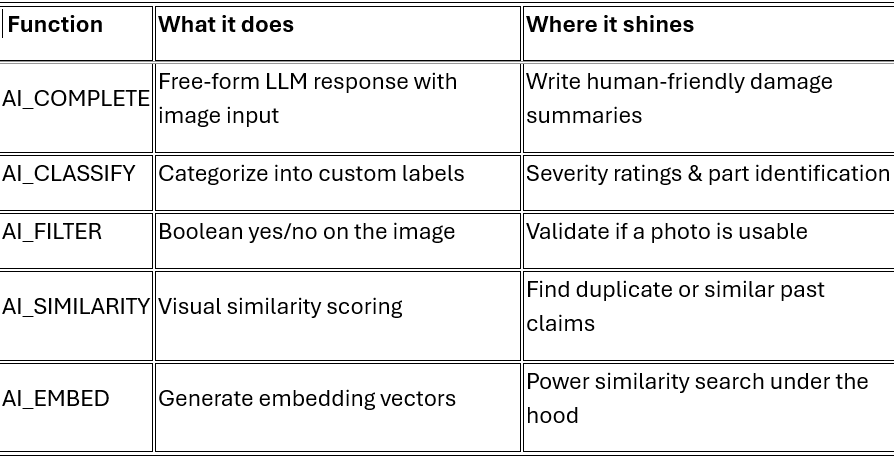
Snowflake gives us five purpose-built image AI functions, each solving one slice of the triage problem:
The beauty of Cortex AI is that all five functions live inside SQL. No data ever leaves Snowflake, no model hosting, no infrastructure to manage.
Steps:
Step 1: Stage Setup
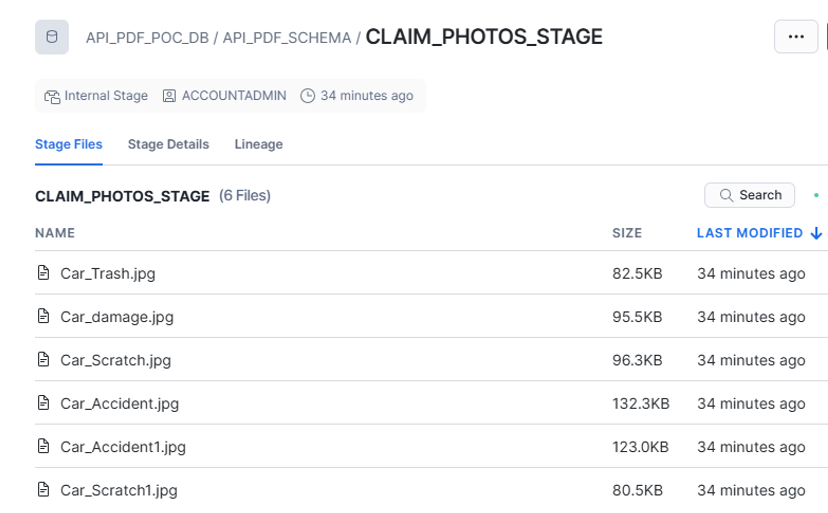
Before we can do anything, we need a place to store claim photos. A Snowflake internal stage with directory listing enabled is perfect.
CREATE OR REPLACE STAGE claim_photos_stage

DIRECTORY  = (ENABLE = TRUE)

ENCRYPTION = (TYPE = 'SNOWFLAKE_SSE');
The DIRECTORY = (ENABLE = TRUE) is what lets us programmatically list all uploaded photos using the DIRECTORY() table function — essential for our similarity search later.
Upload a few claim photos:
Step 2: Describe What’s in the Photo — AI_COMPLETE
Let’s start with the simplest AI function. AI_COMPLETE is a general-purpose LLM call — give it a prompt and an image, get a response.
SELECT AI_COMPLETE(

'claude-sonnet-4-6',

'You are an insurance claim triage assistant. '

|| 'Write a concise 2-3 sentence damage summary for a claims adjuster.',

TO_FILE('@claim_photos_stage', 'Car_damage.jpg')

) AS damage_summary;
What this returns:
"## Damage Summary – Front-End Collision/Fire Damage\n\n**Vehicle:** Renault Master Van (White)\n\nThe vehicle has sustained **significant front-end structural and cosmetic damage**, including a heavily deformed front bumper assembly, torn/displaced bumper fascia on the passenger side, and exposed front crash structure. There is visible **fire or heat damage** evidenced by extensive soot/burn residue across the hood, grille surround, and headlight assemblies. The intercooler and front cooling components appear exposed and potentially compromised, and wiring harnesses are visibly displaced, suggesting possible damage to the engine bay electrical systems.\n\n**Recommended Actions:** Full front-end structural assessment required; inspect radiator, intercooler, cooling fans, and wiring loom for heat/impact damage; evaluate airbag deployment status and frame integrity before repair estimate is finalized.\n\n> ⚠️ **Severity Classification: High** – Vehicle likely non-drivable; potential total loss evaluation may be warranted pending full inspection."
In one SQL call, we’ve generated a piece of text that would have taken an adjuster 5 minutes to write. The TO_FILE() function is the bridge — it converts a stage path into a FILE object that Cortex AI can read.
Why this matters
Why this matters: Every claim file legally requires written notes. Automating the first draft saves hours per adjuster per day.
Step 3: Classify Damage Severity — AI_CLASSIFY (Single-Label)
A free-text summary is nice, but for routing and pricing, we need structured categorical output. That’s AI_CLASSIFY’s job.
SELECT AI_CLASSIFY(

TO_FILE('@claim_photos_stage', 'Car_damage.jpg'),

['Minor damage', 'Moderate damage', 'Severe damage'],

{

'task_description': 'Classify vehicle damage severity from the photo for insurance assessment.'

}

):labels[0]::STRING AS severity;
Breaking this down:
- First argument — the image (via TO_FILE)
- Second argument — your custom category list (you define these!)
- task_description — context that helps the model understand the business meaning
- :labels[0]::STRING — extracts the winning label from the returned JSON object
The result might be “Moderate damage” — and now you can route the claim accordingly. Severe goes to senior adjusters, minor goes to fast-track, moderate gets standard review.
Why this matters: Consistent severity classification means consistent pricing. Two adjusters in different cities now apply the same logic.
Step 4: Validate the Photo Before Spending Tokens — AI_FILTER
Here’s a real problem: not every photo uploaded by a claimant is a usable claim photo. People accidentally upload selfies, screenshots of paperwork, or blurry images of their dashboard. Running expensive classification on garbage photos wastes tokens.
AI_FILTER is your gatekeeper.
SELECT AI_FILTER(

'Return TRUE if this image clearly shows vehicle damage suitable

for insurance claim assessment; return FALSE if it is unrelated,

unclear, or not a vehicle damage photo.',

TO_FILE('@claim_photos_stage', 'Car_damage.jpg')

) AS is_valid;
Important syntax note: For images, AI_FILTER takes two arguments — the instruction first, then the file. This is different from the text version which takes a single combined string. The reason is simple — you can’t concatenate an image into a string!
The function returns TRUE or FALSE directly. Drop it into a WHERE clause to filter out junk photos before running anything expensive.
Steps:
Step 5: Visual Similarity Search — AI_SIMILARITY
This is where things get really interesting. AI_SIMILARITY computes a semantic similarity score between two images — not by matching pixels, but by understanding what’s in the images.
WITH imgs AS (

SELECT RELATIVE_PATH,

TO_FILE('@claim_photos_stage', RELATIVE_PATH) AS img

FROM   DIRECTORY(@claim_photos_stage)

)

SELECT RELATIVE_PATH,

AI_SIMILARITY(

TO_FILE('@claim_photos_stage', 'Car_damage.jpg'),

img

) AS score

FROM   imgs WHERE  RELATIVE_PATH <> 'Car_damage.jpg'

ORDER  BY score DESC;
What’s happening here:
- The WITH imgs AS block lists every photo in the stage and wraps each one as a FILE object
- AI_SIMILARITY compares our reference photo against every other photo
- Results are ranked by similarity score (range: -1 to 1, higher = more similar)
- We exclude the reference photo itself (it would score 1.0 against itself)
The score tells you:
🔴 0.8 – 1.0 Very similar — possible duplicate, flag for SIU
🟡 0.5 – 0.8 Moderately similar — same damage type
🟢 Below 0.5 Different scenarios
Step 6: Wrapping It All in a Streamlit App
The SQL queries above are powerful on their own, but adjusters won’t be writing SQL. The natural next step is to wrap all five Cortex AI functions into a Streamlit-in-Snowflake app — a no-code interface where users pick a photo from the sidebar, choose an analysis task, and see results instantly. The entire app sits inside Snowflake, uses the same SQL we’ve already written, and adds a 🚀 Full Triage option that runs every function on a photo in a single click — turning a 5-minute manual review into a 10-second dashboard view
Key Takeaways
If there’s one big lesson from this build, it’s this: modern AI doesn’t require modern infrastructure complexity.
- No ML team needed — five SQL functions replace what would traditionally be five different ML models
- No data movement — photos stay in Snowflake, no API calls to external services
- Pay-per-use — Cortex AI bills by tokens, so you only pay for what you actually analyze
- No infrastructure to maintain — Snowflake handles the GPUs, the model serving, the scaling
This is the future of enterprise AI — embedded directly in your data platform, accessible to anyone who can write SQL