Modern enterprises rarely operate within the boundaries of a single platform. Data teams today juggle multiple tools — cloud data warehouses, analytics platforms, BI tools, and data lakes — all of which need to talk to each other efficiently and without data duplication.
Snowflake is the gold standard for cloud data warehousing: elastic compute, zero-copy cloning, robust governance, and industry-leading performance. Microsoft Fabric is Microsoft’s unified analytics platform that brings together data engineering, data science, real-time analytics, and business intelligence into a single, OneLake-powered experience.
So what happens when your organization is invested in both? Until recently, sharing data between Snowflake and Fabric meant complex ETL pipelines, data duplication, and painful synchronization overhead. That changes with Apache Iceberg.
Details:
The Power of Apache Iceberg as the Common Language
Apache Iceberg is an open table format designed for huge analytic datasets. It brings ACID transactions, schema evolution, and time travel to data lakes — and critically, it is platform-agnostic. Both Snowflake and Microsoft Fabric natively support Iceberg, which makes it the perfect “universal handshake” between the two platforms.
Here’s what this integration unlocks for your organization:
- Eliminate data silos — Write data once in Snowflake, read it directly in Fabric. No ETL, no duplication.
- Reduce storage costs — Data lives in OneLake (Fabric’s storage layer) and is queryable from both platforms simultaneously.
- Leverage best-of-breed tools — Use Snowflake’s powerful SQL engine for data processing and Fabric’s notebooks, pipelines, and Power BI for analytics and reporting.
- Open format, no vendor lock-in — Iceberg is open source, so your data isn’t locked to either platform’s proprietary format.
- Scalable multi-cloud architecture — Build a true lakehouse architecture that spans clouds without compromising performance or governance.
This integration is ideal for organizations running hybrid analytics environments, teams that want to modernize without full platform migration, and architects building future-proof data platforms.
Architecture Overview
At a high level, the integration works like this:
- Snowflake creates an External Volume pointing to Microsoft Fabric’s OneLake storage (Azure Data Lake Gen2 under the hood).
- Snowflake creates Iceberg Tables that physically store their Parquet files and metadata in OneLake.
- Microsoft Fabric accesses those same Iceberg files directly via OneLake Shortcuts, without any data movement.
Both platforms can read and write to the same underlying data — governed, versioned, and open.
Step-by-Step Implementation Guide
Prerequisites
Prerequisites
Before you begin, make sure you have:
- Snowflake account with privileges to create External Volumes
- Microsoft Fabric workspace with Lakehouse enabled
- Your Azure Tenant ID (we’ll show you how to find it)
- Your OneLake Base URL for the Lakehouse
- Admin permissions in both Snowflake and Microsoft Fabric
Step 1: Set Up Your Fabric Lakehouse and Gather Configuration Details
First, create a dedicated Lakehouse in your Fabric workspace:
- Open your Fabric Workspace → Click New Item → Select Lakehouse → Name it (e.g., snowflakeQS).
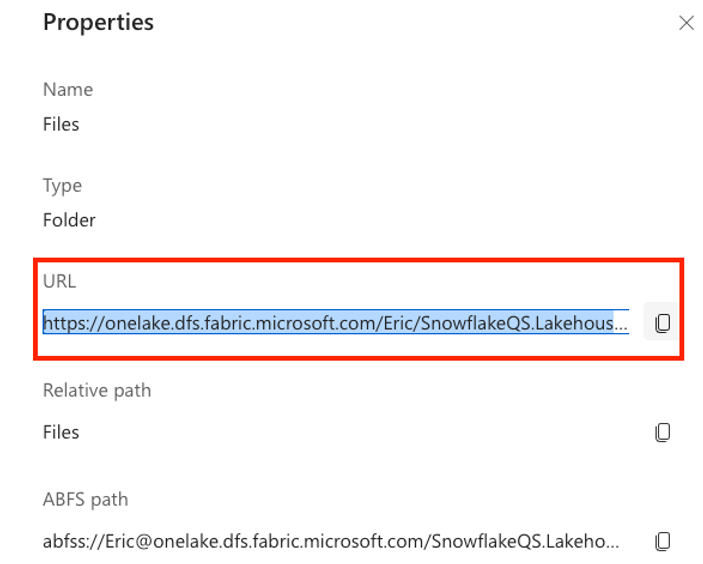
- In the Lakehouse Explorer, click the ellipsis (⋮) next to Files → Properties.
- Copy the OneLake URL from the Properties pane.
- Important: Replace https:// with azure:// — this is the format Snowflake’s External Volume requires.
To find your Azure Tenant ID:
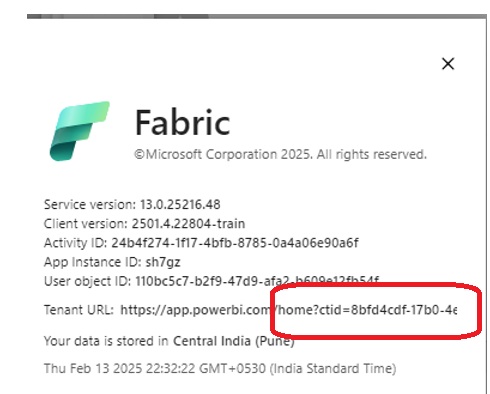
- Click Help & Support (?) in the top-right corner of Fabric.
- Select About Fabric.
- Copy the Tenant URL — the UUID after ctid= is your Azure Tenant ID.
Step 2: Create an External Volume in Snowflake
An External Volume is a Snowflake object that stores information about your cloud storage location and IAM configuration. It’s the bridge that allows Snowflake to reach out to OneLake.
Run the following SQL in your Snowflake worksheet:
CREATE OR REPLACE EXTERNAL VOLUME FabricExVol

STORAGE_LOCATIONS = (

(

NAME = 'FabricExVol',

STORAGE_PROVIDER = 'AZURE',

STORAGE_BASE_URL = 'azure://onelake.dfs.fabric.microsoft.com/<your_workspace>/snowflakeQS.Lakehouse/Files',

AZURE_TENANT_ID = '<YOUR_TENANT_ID>'

)

);
Replace <your_workspace> and <YOUR_TENANT_ID> with the values you gathered in Step 1.
Fabric:
Step 3: Grant Snowflake Access to Microsoft Fabric
This is where the trust is established between the two platforms. Run the following in Snowflake to retrieve the consent URL:
DESC EXTERNAL VOLUME FabricExVol;
From the output, locate the AZURE_CONSENT_URL property. Copy this URL and open it in your browser. This navigates to Microsoft’s OAuth consent screen — accept the consent to authorize Snowflake’s service principal to access your Fabric/OneLake storage.
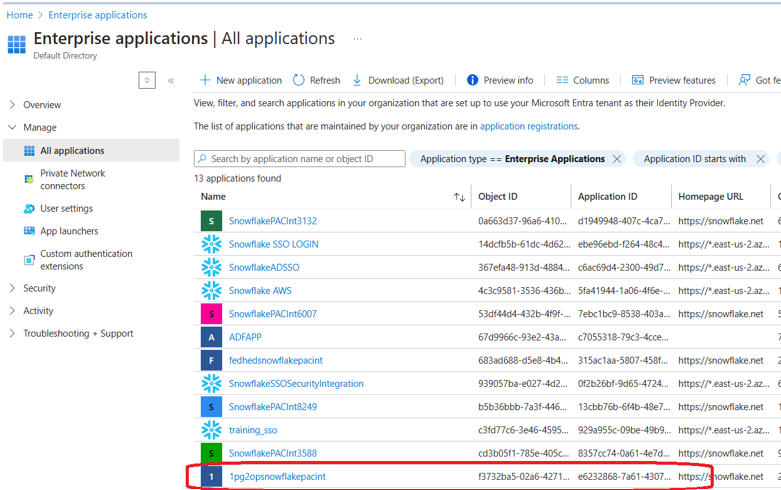
Next, verify that Snowflake’s service principal has appeared in your Azure Enterprise Applications:
- Go to portal.azure.com
- Navigate to Microsoft Entra ID → Enterprise Applications
- Search for the service principal name found under AZURE_MULTI_TENANT_APP_NAME in the DESC EXTERNAL VOLUME output (it will look something like 1pg2opsnowflakepacint_…)
STEPS
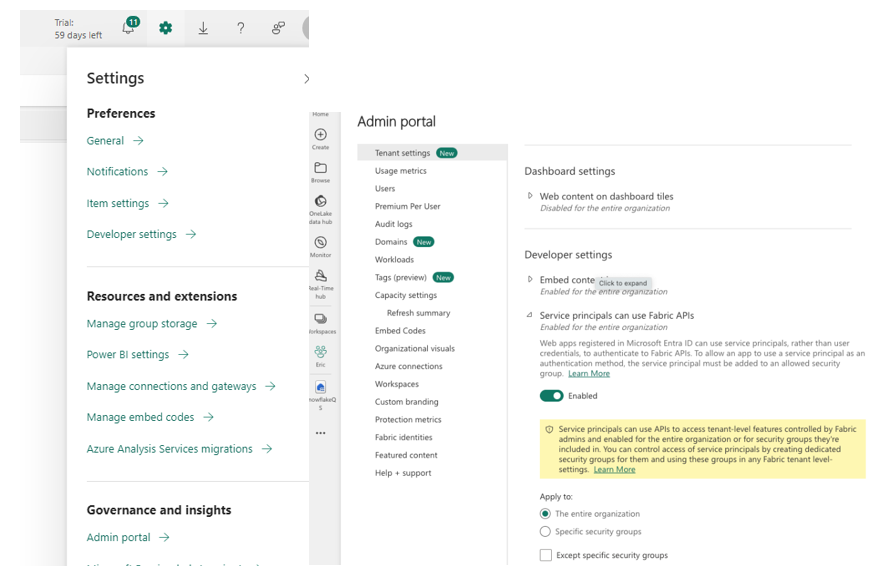
Step 4: Grant the Snowflake Service Principal Access in Fabric
Now give that service principal the permissions it needs inside Microsoft Fabric:
- In Fabric, go to Admin Portal → Developer Settings.
- Enable “Service Principals can use Fabric APIs”.
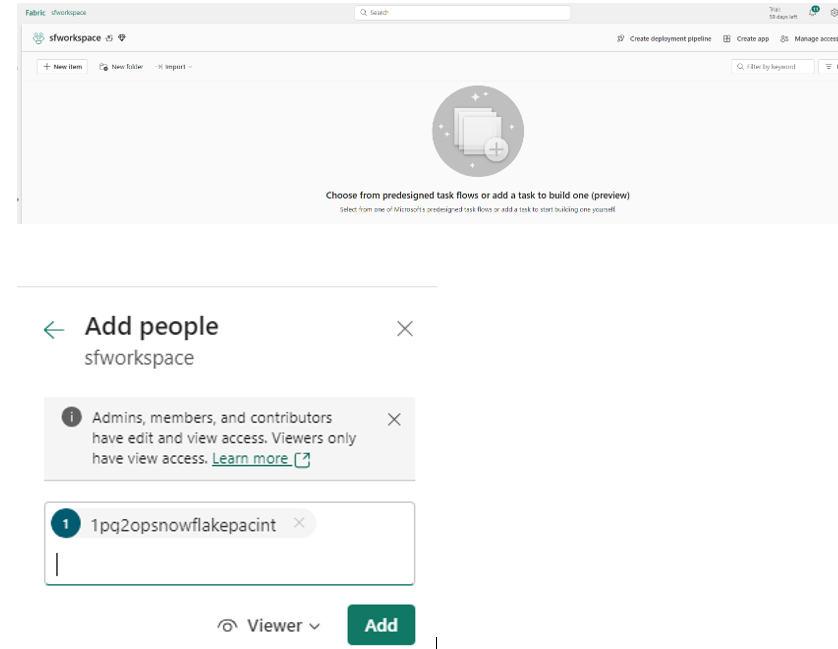
- Navigate back to your Workspace → Click Manage Access.
- Click Add People or Groups → Search for the service principal name (from AZURE_MULTI_TENANT_APP_NAME).
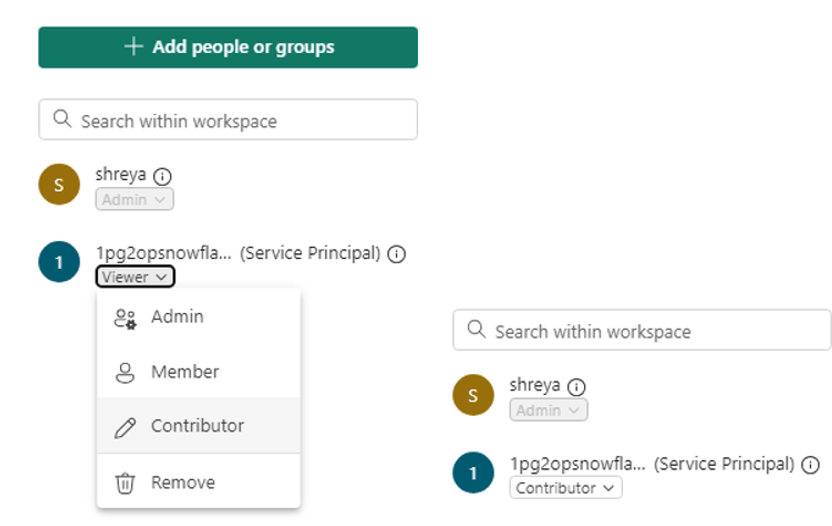
- Select it and assign the Contributor role.
Key note: Make sure to change the role from Viewer to Contributor — Viewer permissions will not be sufficient for Snowflake to write Iceberg metadata and Parquet files.
Step 5: Create and Populate the Iceberg Table in Snowflake
With the connectivity in place, you’re ready to create your first Iceberg table. This table will physically store its data in OneLake:
CREATE OR REPLACE ICEBERG TABLE snowflakeQS.ICEBERGTEST.dim_customer (

C_CUSTKEY     STRING,

C_NAME        STRING,

C_ADDRESS     STRING,

C_NATIONKEY   STRING,

C_PHONE       STRING,

C_ACCTBAL     STRING,

C_MKTSEGMENT  STRING,

C_COMMENT     STRING

)

EXTERNAL_VOLUME = 'FabricExVol'

CATALOG        = SNOWFLAKE

BASE_LOCATION  = 'dim_customer';
Load some sample data (Snowflake’s built-in TPCH dataset works perfectly for testing):
INSERT INTO snowflakeQS.ICEBERGTEST.dim_customer
SELECT TOP 500 * FROM SNOWFLAKE_SAMPLE_DATA.TPCH_SF1.customer;
Verify everything is working:
SELECT * FROM snowflakeQS.ICEBERGTEST.dim_customer;
If you see 500 rows, congratulations — your Iceberg table is live and data is now stored in OneLake!
Step 6: Access the Iceberg Data from Microsoft Fabric
Now let’s open the data from the Fabric side:
- Open your Fabric Workspace containing the Lakehouse.
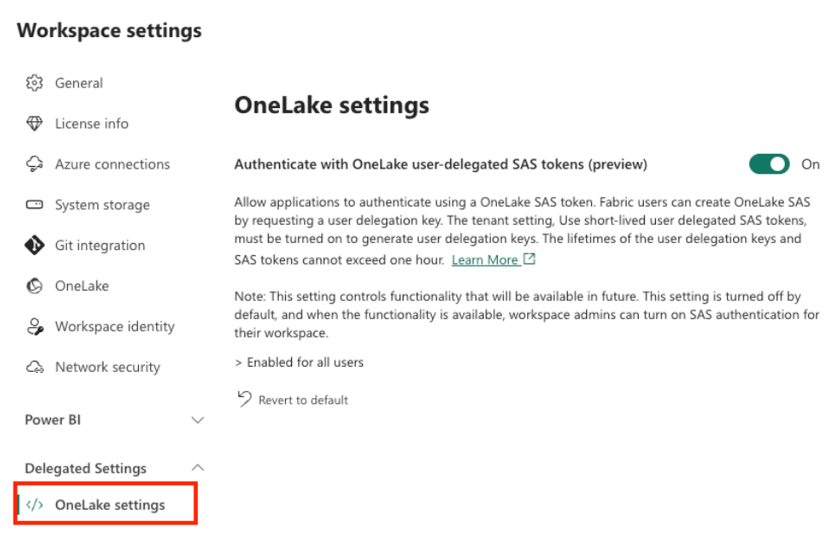
- Go to Workspace Settings → OneLake Settings.
Enable “Authenticate with OneLake user-delegated SAS tokens” (this is a temporary step required for cross-platform access)
one lake
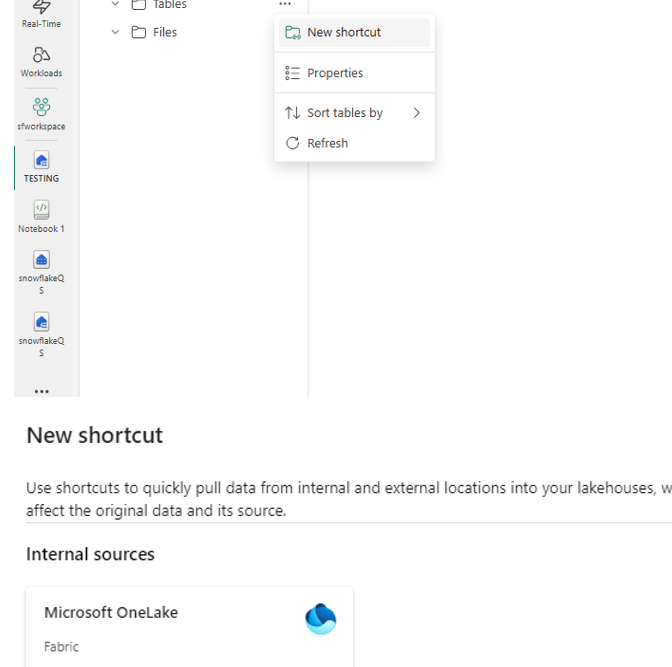
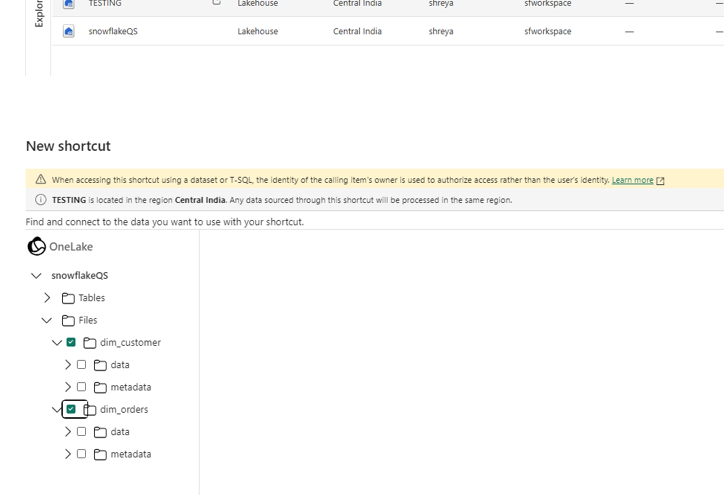
Step 7: Create OneLake Shortcuts for Seamless Access
Shortcuts are Fabric’s elegant way of creating pointers to data stored elsewhere in OneLake — including data written by Snowflake. Here’s how to set one up:
- Open your Fabric Lakehouse.
- Click “New Shortcut” → Select OneLake Shortcut.
- Enter your OneLake storage location details.
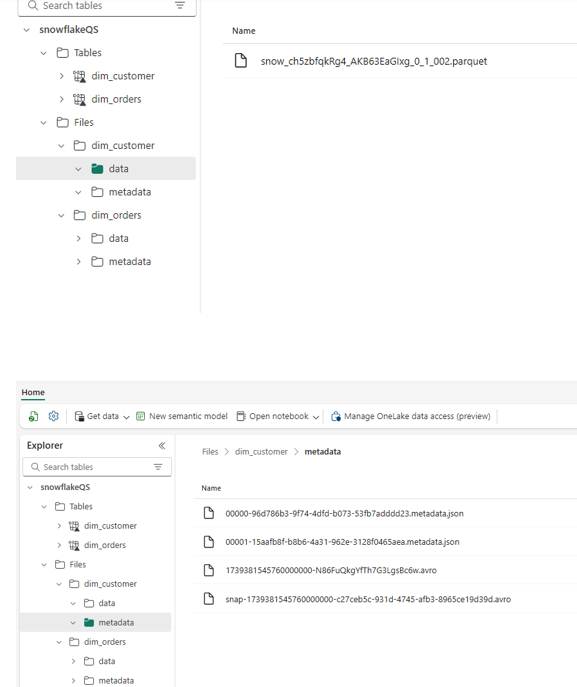
- Navigate the folder structure to locate your Iceberg table folder (e.g., dim_customer).
- Important: Select the table folder itself — do NOT select the data or metadata subfolders. Selecting the root table folder is what enables Fabric to recognize it as an Iceberg table.
Summary: What You’ve Built
By following these steps, you have successfully:
- Created an Iceberg Table in Snowflake.
- Established Secure Connectivity between Snowflake and Fabric.
- Granted Required Permissions to Snowflake in Fabric.
- Loaded and Queried Iceberg Data in both Snowflake & Fabric.
Enabled Fabric Shortcuts for seamless access