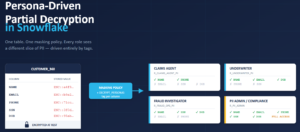
Data Masking with Snowflake Tags: Data governance is no longer optional—it’s a regulatory and business imperative. Organizations handling sensitive data like PII (Personally Identifiable Information) must ensure that the right people see the right data at the right time. But here’s the challenge: How do you scale data masking across multiple tables and number of columns without manual intervention?
The answer lies in combining two powerful technologies:
- Snowflake’s Tag-Based Masking Policies — for dynamic, role-aware data protection
- dbt’s Post-Hooks — for automating governance as part of your data pipeline.
In this blog, I’ll walk you through a complete implementation where classification tags are automatically applied to columns every time a dbt model runs, ensuring your masking policies are always in sync with your data.
Why This Approach Matters
If masking is done manually, there’s a risk that:
- dbt creates the table
- masking/tag is applied later
That delay creates a governance gap, where sensitive data can be visible temporarily.
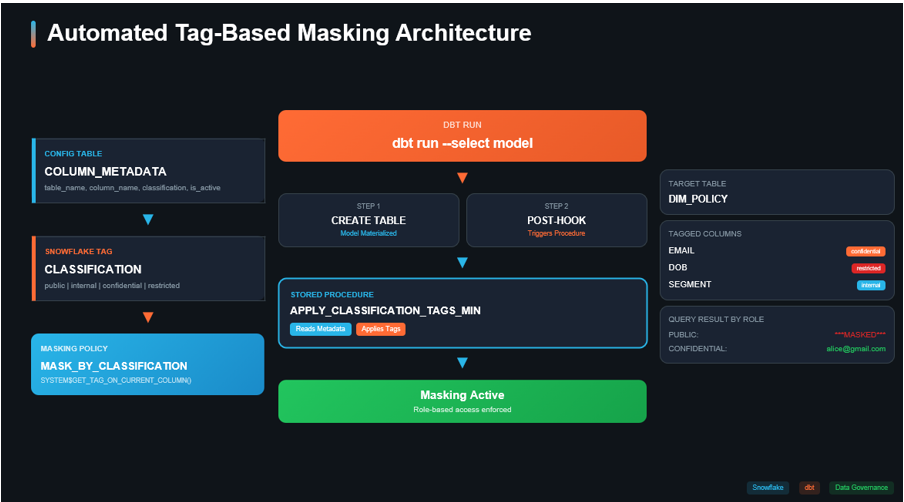
So the goal of this solution is simple:
dbt builds the table → post-hook calls a Snowflake procedure → procedure reads metadata and applies tags → masking policies enforce visibility at query time.
The Solution
The Solution: Tag-Based Masking + dbt Automation
By combining Snowflake tags with dbt, we achieve:
- Single masking policy that adapts based on tag values
- Metadata-driven classification — change a row in a table, not DDL
- Automated tag application — governance happens at build time
- Separation of concerns — data engineers build, governance team classifies
Step-by-Step Implementation
Step 1: Set Up the Governance Database
First, we create a dedicated database for all governance objects. Keeping governance artifacts separate from business data is a best practice.
CREATE OR REPLACE DATABASE DATA_GOVERNANCE;
CREATE SCHEMA IF NOT EXISTS DATA_GOVERNANCE.PUBLIC;
Step 2: Create Sample Data
Let’s create a sample CUSTOMERS table with sensitive columns:
CREATE OR REPLACE TABLE DATA_GOVERNANCE.PUBLIC.CUSTOMERS (

CUSTOMER_ID NUMBER,

EMAIL STRING,

DOB DATE,

SEGMENT STRING

);
INSERT INTO DATA_GOVERNANCE.PUBLIC.CUSTOMERS

(CUSTOMER_ID, EMAIL, DOB, SEGMENT)

VALUES

(1001, 'alice@gmail.com', TO_DATE('1992-04-18'), 'RETAIL'),

(1002, 'bob@company.com', TO_DATE('1988-11-05'), 'ENTERPRISE'),

(1003, NULL, TO_DATE('1999-01-22'), 'SMB'),

(1004, 'david@yahoo.com', NULL, 'RETAIL'),

(1005, 'eva@provider.net', TO_DATE('1975-07-30'), NULL);
Step 3: Create the Classification Tag
Snowflake tags are key-value pairs that can be attached to objects and columns. We create a tag with predefined allowed values representing our classification levels:
CREATE TAG DATA_GOVERNANCE.PUBLIC.CLASSIFICATION ALLOWED_VALUES 'public', 'internal', 'confidential','restricted;
Step 4: Create the Metadata Configuration Table
This is the heart of our metadata-driven approach. Instead of hardcoding classifications, we store them in a configuration table:
CREATE OR REPLACE TABLE DATA_GOVERNANCE.PUBLIC.COLUMN_METADATA (

table_name STRING, -- target table name

column_name STRING, -- physical column name

standard_name STRING, -- logical/business name

classification STRING, -- public|internal|confidential|restricted

is_active BOOLEAN DEFAULT TRUE,

last_updated TIMESTAMP_NTZ DEFAULT CURRENT_TIMESTAMP

);
Populate it with your column classifications:
INSERT INTO DATA_GOVERNANCE.PUBLIC.COLUMN_METADATA

(table_name, column_name, standard_name, classification, is_active)

VALUES

('CUSTOMERS_DETAIL', 'EMAIL', 'email_address', 'confidential', TRUE),

('CUSTOMERS_DETAIL', 'DOB', 'date_of_birth', 'restricted', TRUE),

('CUSTOMERS_DETAIL', 'SEGMENT', 'customer_segment', 'internal', TRUE);
Why This Matters:
- Governance teams can update classifications without touching code
- The is_active flag allows disabling masking without deleting config
- last_updated provides audit trail
- standard_name enables data catalog integration
Step 5: Create Tag-Based Masking Policies
Now we create masking policies that read the tag value at query time:
CREATE OR REPLACE MASKING POLICY DATA_GOVERNANCE.PUBLIC.MASK_BY_CLASSIFICATION_STRING
AS (val STRING) RETURNS STRING ->
CASE
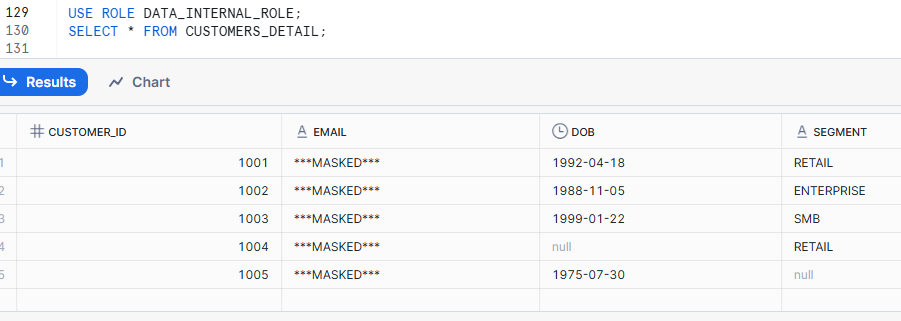
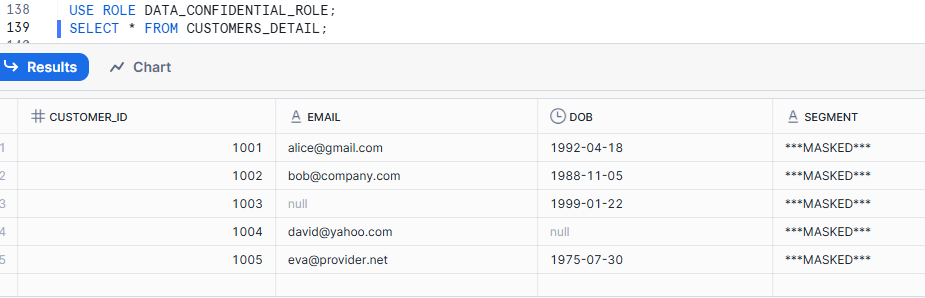
WHEN SYSTEM$GET_TAG_ON_CURRENT_COLUMN('DATA_GOVERNANCE.PUBLIC.CLASSIFICATION') = 'public'
THEN val
WHEN SYSTEM$GET_TAG_ON_CURRENT_COLUMN('DATA_GOVERNANCE.PUBLIC.CLASSIFICATION') = 'internal'
AND CURRENT_ROLE() IN ('DATA_INTERNAL_ROLE')
THEN val
WHEN SYSTEM$GET_TAG_ON_CURRENT_COLUMN('DATA_GOVERNANCE.PUBLIC.CLASSIFICATION') = 'confidential'
AND (CURRENT_ROLE() IN ('DATA_CONFIDENTIAL_ROLE','DATA_RESTRICTED_ROLE'))
THEN val
ELSE '***MASKED***'
END;
The Magic of SYSTEM$GET_TAG_ON_CURRENT_COLUMN():
This function dynamically reads the tag value attached to the column being queried. This means:
- One policy handles all classification levels
- No need to modify the policy when classifications change
- Tag changes take effect immediately
Step 6: Attach Masking Policy to the Tag
This is the key step that links everything together:
ALTER TAG DATA_GOVERNANCE.PUBLIC.CLASSIFICATION

SET MASKING POLICY DATA_GOVERNANCE.PUBLIC.MASK_BY_CLASSIFICATION_STRING;
Now, any column tagged with CLASSIFICATION will automatically have the masking policy applied. No need to attach policies to individual columns!
Step 7: Create the Tag Application Procedure
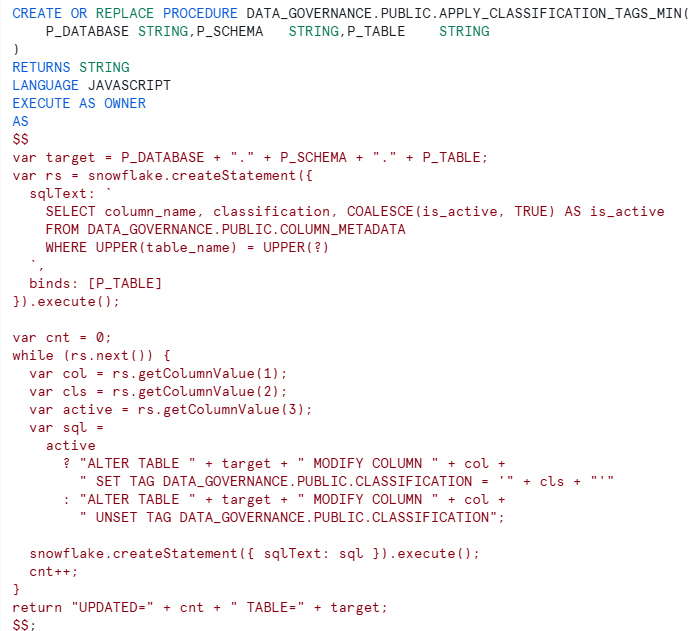
Procedure Highlights:
Procedure Highlights:
- Accepts database, schema, and table as parameters (perfect for dbt)
- Reads classifications from metadata table
- Respects is_active flag — can unset tags when disabled
- Returns count of columns updated for logging
The dbt Integration
Now comes the powerful part — automating this with dbt post-hooks.
Step 8: Create the dbt Macro
Create a macro in your dbt project (e.g., macros/classification_governance.sql):
{% macro classification_governance_post_hook() %}

{{ return(

"CALL DATA_GOVERNANCE.PUBLIC.APPLY_CLASSIFICATION_TAGS_MIN('"

~ this.database ~ "','"

~ this.schema ~ "','"

~ this.identifier ~ "')"

) }}

{% endmacro %}
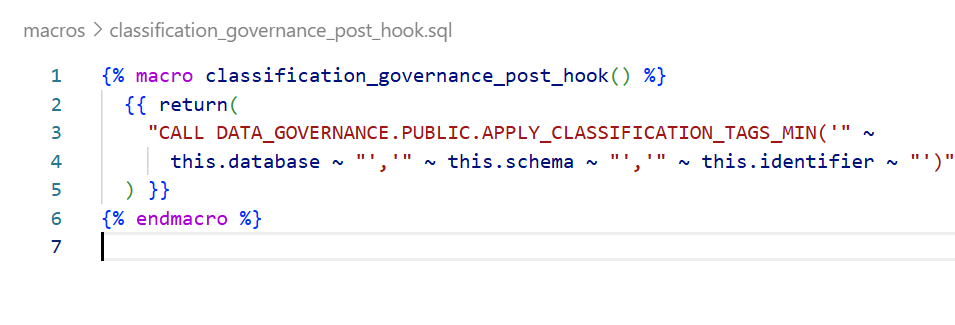
How It Works:
- this.database — the database where the model is materialized
- this.schema — the schema of the model
- this.identifier — the table/view name
- These are dbt context variables available at runtime
Step 9: Apply to Your dbt Model
Now, any model that needs governance simply includes the post-hook:
— models/customers_detail.sql

What Happens at Runtime
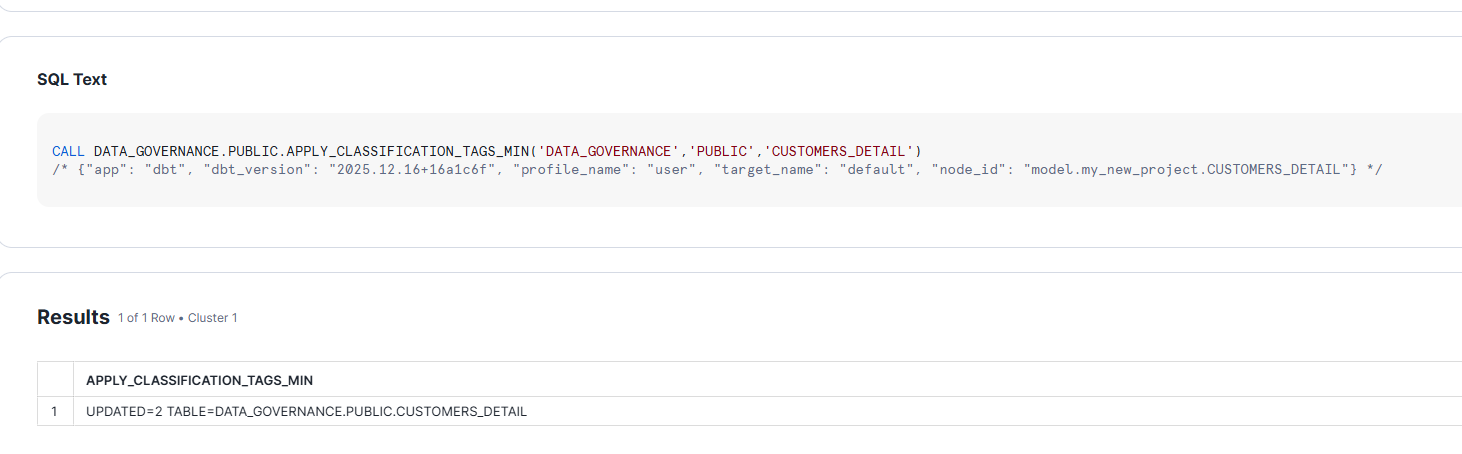
When you run dbt run –select customers_detail:
- dbt creates/replaces the table DATA_GOVERNANCE.PUBLIC.CUSTOMERS_DETAIL
- Post-hook fires calling APPLY_CLASSIFICATION_TAGS_MIN
- Procedure reads COLUMN_METADATA for CUSTOMERS_DETAIL
- Tags are applied to EMAIL, DOB, SEGMENT columns
- Masking is now active based on user’s role
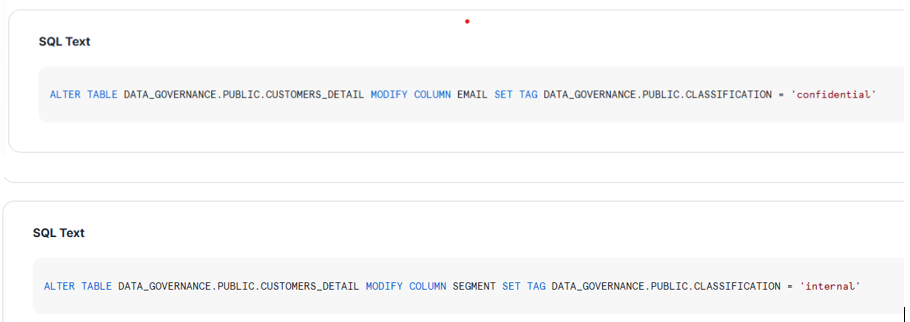
Once we run the model, it applies TAGS to the columns:
Scaling Across Your dbt Project
Option 1: Apply to Specific Models
Add the post-hook to individual models that contain sensitive data:
{{ config(
post_hook = “{{ classification_governance_post_hook() }}”
) }}
Option 2: Apply to All Models via dbt_project.yml
# dbt_project.yml
models:
your_project:
staging:
+post-hook: “{{ classification_governance_post_hook() }}”
Conclusion
By combining Snowflake’s tag-based masking with dbt’s post-hooks, we’ve created a governance framework that:
- Scales automatically with your data models
- Requires zero manual intervention after initial setup
- Keeps governance in sync with your data pipeline
- Empowers governance teams with metadata-driven control
This pattern transforms data governance from a bottleneck into an automated, integral part of your data platform.