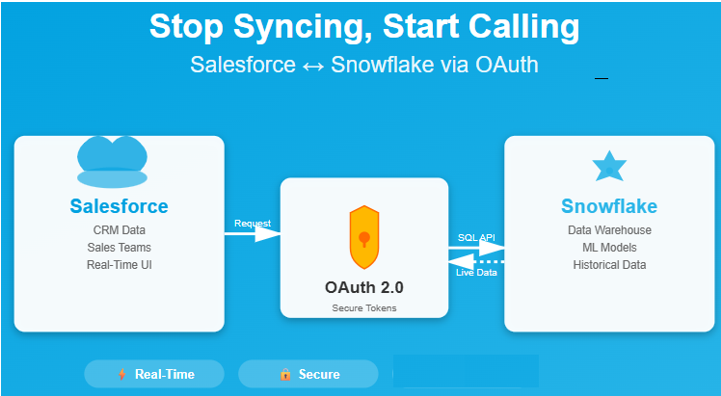
Zero-Copy CRM: Snowflake from Salesforce with OAuth: Most CRM decisions happen in Salesforce, while the truth lives in Snowflake. However, Instead of copying data (ETL) or waiting for a managed “direct connector” to be available, you can call Snowflake live from Salesforce using OAuth + Named Credential + Snowflake SQL API. Being that,It’s secure, fast to set up in a Developer Edition, and keeps governance in Snowflake.
Why Auth (OAuth) is needed
- Certainly,Passwords in code are risky and messy to rotate.
- Secondly, OAuth gives Salesforce a short-lived access token to call Snowflake—no password stored anywhere.
- Besides, tokens can be scoped to a least-privilege role/warehouse/database/schema.
- Finally, You can revoke or rotate access without redeploying code.
What we’re building
Nevertheless,A zero-copy, zero-middleware pattern where Salesforce calls the Snowflake SQL API using a Named Credential that’s authenticated via Snowflake OAuth. Moreover, You render the answer in Salesforce (Apex/Visualforce/Flow/LWC) without importing any data.
Why this use case matters
- Lower risk & cost: Lest, No extra Salesforce storage or duplicated PII.
- Governance stays in Snowflake: Identically the Roles, masking, tags, and audit logs remain centralized.
- Lastly, Works in Developer Edition: Perfect for POCs and learning—no special SKUs.

Core concepts you must know
Core concepts you must know
What is OAuth:
A token-based login. Salesforce gets a short-lived access token (and a refresh token) from Snowflake instead of storing a password. Tokens are scoped and revocable.
What is a Security Integration in Snowflake?
So, It’s Snowflake’s OAuth app registration—the config that says “who can request tokens, where to send them back, issue refresh tokens, etc.”
- TYPE = OAUTH: Snowflake is the authorization server (what we used).
- (Alternatively, TYPE = EXTERNAL_OAUTH if you want Okta/Azure AD to issue tokens.)
What does a Named Credential do in Salesforce?
- Firstly, Stores tokens securely.
- Additionally, Adds Authorization: Bearer … to requests automatically.
- Refreshes tokens when they expire.
Technical Implementation:
Technical Implementation:
PHASE 1: SNOWFLAKE SETUP (Steps 1-3)
STEP 1: Create Dedicated Snowflake User & Role
CREATE OR REPLACE USER  DATA_CLOUD_USER

PASSWORD = 'Thakurji@2020'

LOGIN_NAME = DATA_CLOUD_USER

DISPLAY_NAME = DATA_CLOUD_USER

DEFAULT_ROLE = public;
create role if not exists SFDC_DEMO_R;
grant role SFDC_DEMO_R to user sachinsnowpro; -- or create a new user and grant;
grant usage on warehouse compute_wh to role SFDC_DEMO_R;
STEP 2: Create Database, Schema, Table & Grant Permissions
create database sales_force_db;
CREATE OR REPLACE TABLE sales_force_db.PUBLIC.CUSTOMER_DATA (

ID NUMBER,

NAME STRING,

EMAIL STRING,

CREATED_DATE DATE

);
INSERT INTO CUSTOMER_DATA VALUES

(1, 'John Doe', 'john@example.com', CURRENT_DATE()),

(2, 'Jane Smith', 'jane@example.com', CURRENT_DATE());
— Make sure the role can use at least one DB/SCHEMA
grant usage on database sales_force_db to role SFDC_DEMO_R;
grant usage on schema sales_force_db.public to role SFDC_DEMO_R;
grant all privileges on all tables in schema sales_force_db.public to role SFDC_DEMO_R;
grant role SFDC_DEMO_R to user DATA_CLOUD_USER;
alter user DATA_CLOUD_USER set default_role = SFDC_DEMO_R;
STEP 3: Create Security Integration
create or replace security integration SALESFORCE_OAUTH

type = OAUTH

enabled = true

oauth_client = CUSTOM

oauth_client_type = 'CONFIDENTIAL'

oauth_redirect_uri = 'https://login.salesforce.com/services/authcallback/Snowflake_OAuth'  -- temporary

oauth_issue_refresh_tokens = true

oauth_refresh_token_validity = 2592000;  -- 30 days

;
2) Get client credentials (you’ll paste these in Salesforce)
select system$show_oauth_client_secrets('SALESFORCE_OAUTH');
{

"OAUTH_CLIENT_ID": "0ilAXfmdtCJzx4IC/E/uFQLz",

"OAUTH_CLIENT_SECRET": "bwg6uyaGCkCZyKz8Vapiq"

}
OAUTH_REDIRECT_URI: Where to send tokens after login. Only this exact URL allowed.
OAUTH_ISSUE_REFRESH_TOKENS = TRUE: Give refresh tokens.
OAUTH_REFRESH_TOKEN_VALIDITY = 7776000: Tokens last 90 days and Must re-auth every 90 days
Snowflake now has an “OAuth Server” that:
- Can issue tokens to Salesforce
- Only responds to requests from your specific Salesforce org
- Tokens expire in 90 days
The CLIENT_ID and CLIENT_SECRET are like:
CLIENT_ID = Username for Salesforce (the app)
CLIENT_SECRET = Password for Salesforce (the app)
PHASE 2: SALESFORCE SETUP and SNOWFLAKE CONFIGURE (Steps 4-6)
STEP 4: Create Auth Provider in Salesforce
Setup → Auth. Providers → New
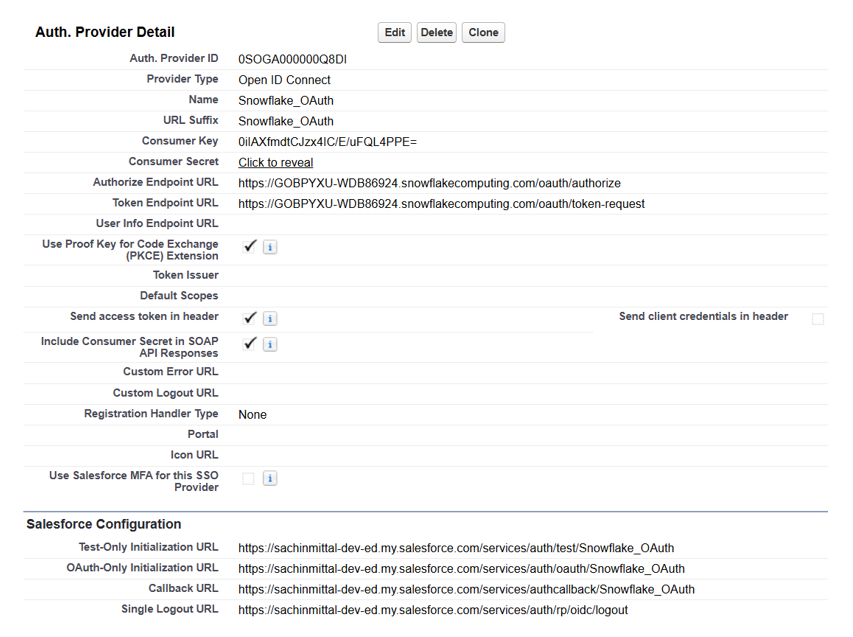
STEP 5: Update Security Integration with Callback URL
Alter security integration SALESFORCE_OAUTH set oauth_redirect_uri = 'https://sachinmittal-dev-ed.my.salesforce.com/services/authcallback/Snowflake_OAuth';
This ensures:
– Tokens can ONLY go to your Salesforce org
– Even if someone steals CLIENT_ID/SECRET, they can’t get tokens
STEP 6: Create Named Credential
Setup → Named Credentials → New Named Credential
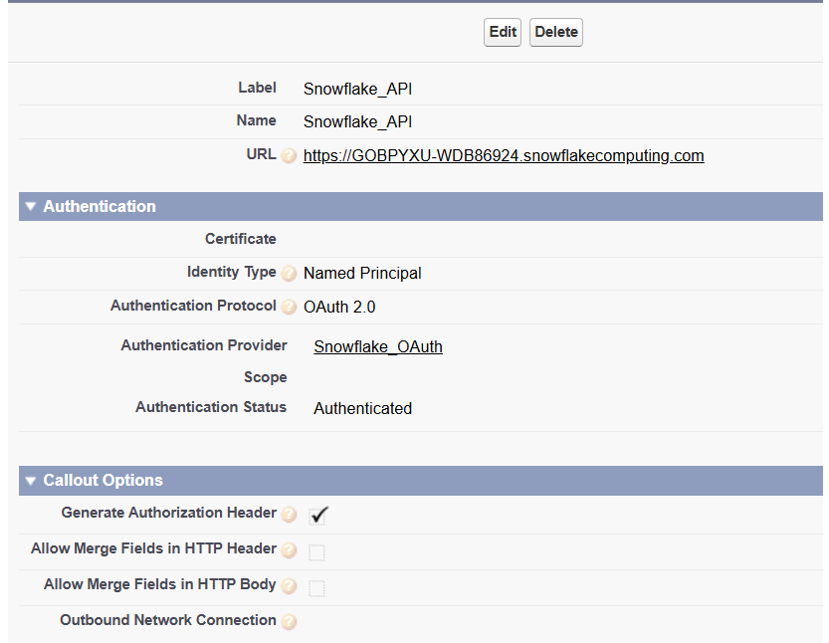
What it actually does
What it actually does
- Stores OAuth tokens securely
- Access + refresh tokens are stored by Salesforce, not in your code, not in custom settings.
- Auto-refreshes tokens
- When the access token expires, Salesforce uses the refresh token to get a new one silently.
- Handles OAuth complexity
- Consent screen, callback, token exchange, error handling stubs—done by the platform.
PHASE 3: AUTHENTICATION (Step 7)
STEP 7: Authenticate the Named Credential
What happens:
- Salesforce redirects you to Snowflake login page
- You login: Username = DATA_CLOUD_USER, Password = <your password>
- Snowflake asks: “Salesforce wants to access your data. Allow?”
- You click: “Allow”
- Snowflake creates: Temporary authorization code (expires in 10 min)
- Browser redirects back to Salesforce with code
- Salesforce exchanges code for real tokens (behind the scenes)
- Tokens stored encrypted in Named Credential
- Status shows: Authenticated
PHASE 4: USAGE (Step 8)
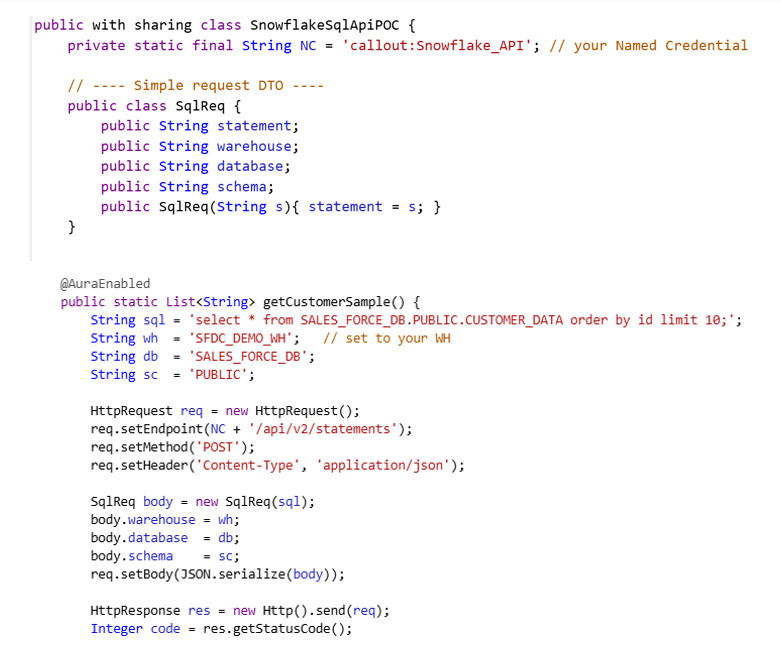
STEP 8: Write and Test Apex Class
HttpRequest req = new HttpRequest(); req.setEndpoint(‘callout:Snowflake_API/api/v2/statements’);
Step 9: Display the Data (UI)
From here, you can render this data in any Salesforce UI:
- Visualforce pages – Traditional table view
- Lightning Web Components – Modern, reactive UI
- Flows – No-code screen flows with data tables
I’ll leave the UI implementation to Salesforce experts—there are many ways to display the data based on your org’s standards and user preferences.
Note: I’m not a Salesforce expert. I built this integration as a learning project because I had some past interest in Salesforce and wanted to understand how these systems could talk to each other securely.
What We Actually Built (Quick Recap)
In Snowflake:
- Created a dedicated service account (DATA_CLOUD_USER) and least-privilege role (SFDC_DEMO_R)
- Set up database, schema, and tables with read-only permissions granted to our role
- Made the service role default (avoiding ACCOUNTADMIN for security)
- Created OAuth Security Integration and extracted the client ID and secret
- Configured Auth Provider with Snowflake’s OAuth endpoints
- Grabbed the callback URL from Salesforce and updated Snowflake’s Security Integration
- Created Named Credential pointing to Snowflake API
- Authenticated once using our service account credentials
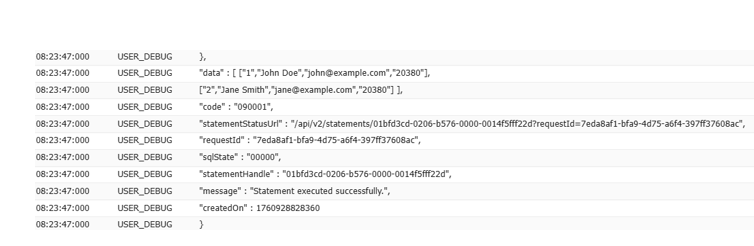
- Wrote a simple Apex class to query Snowflake via SQL API
- Tested it—got live data back!