MCP Connects GitHub Copilot in VS Code to Snowflake Cortex Agents: Enterprise AI is rapidly moving beyond standalone chatbots and isolated copilots. Organizations now want AI systems that can securely interact with governed enterprise data, structured analytics, and unstructured knowledge — directly from the tools developers already use every day.
In this implementation, we built a powerful integration between:
- GitHub Copilot
- MCP (Model Context Protocol)
- Snowflake Cortex Agent
- Cortex Analyst
- Cortex Search Service (CSS)
The result is an enterprise-grade AI experience where a developer can ask business questions directly inside GitHub Copilot Chat in VS Code, while the actual reasoning and data retrieval happens securely inside Snowflake.
How do we connect GitHub Copilot with Snowflake Cortex Agents securely and intelligently?
The answer is:
MCP — Model Context Protocol
MCP — Model Context Protocol
Think of MCP as: A bridge between AI assistants and enterprise systems
MCP allows tools to be exposed dynamically to AI assistants such as:
- GitHub Copilot
- Claude Desktop
- Cursor
- VS Code AI agents
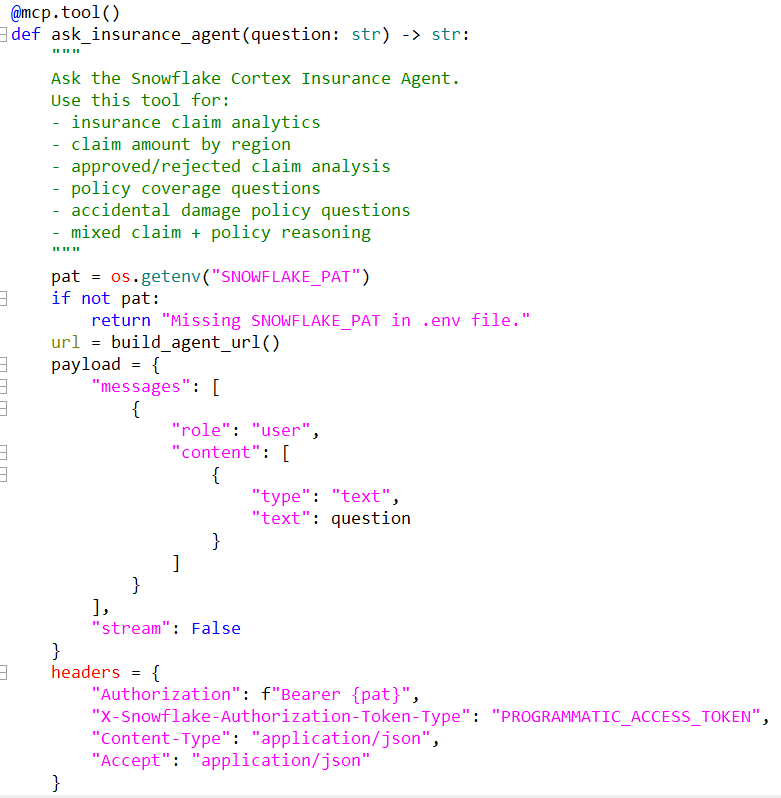
In our implementation, we exposed a tool called:
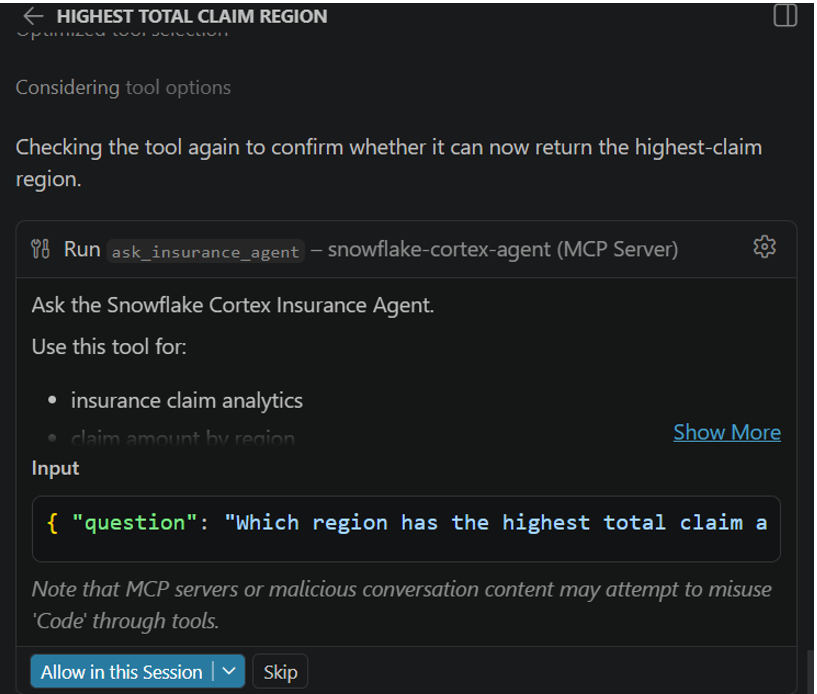
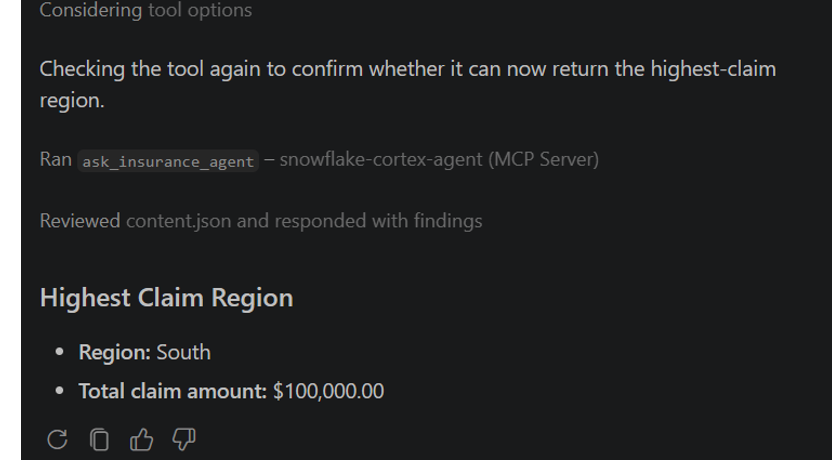
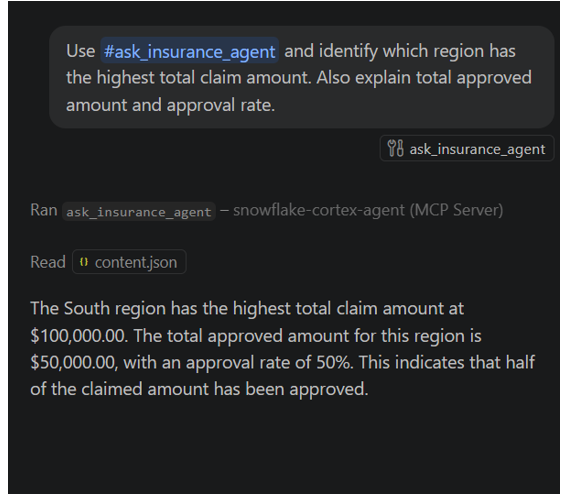
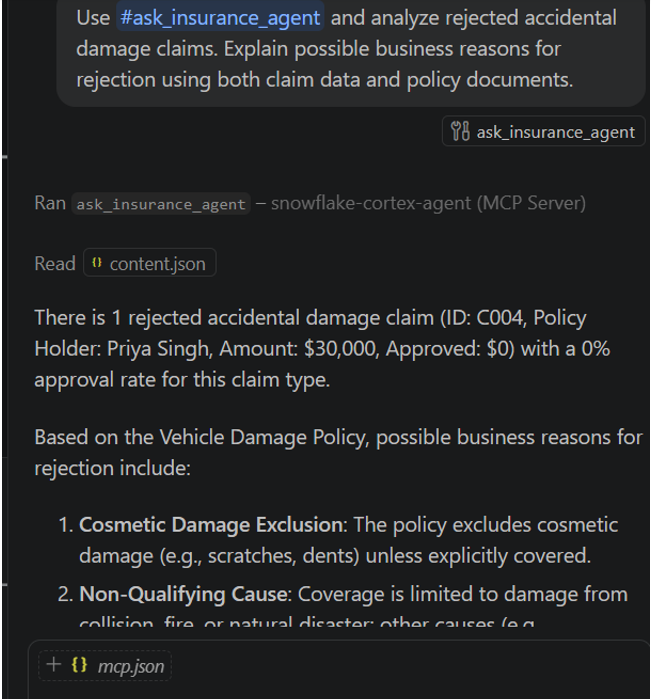
- ask_insurance_agent(question)
This tool became available directly inside GitHub Copilot Chat.
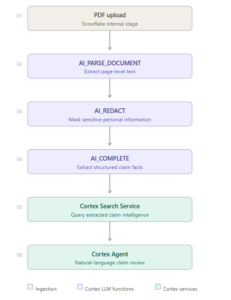
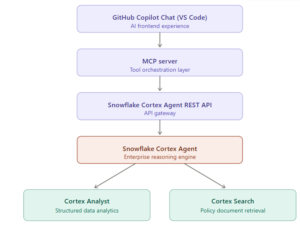
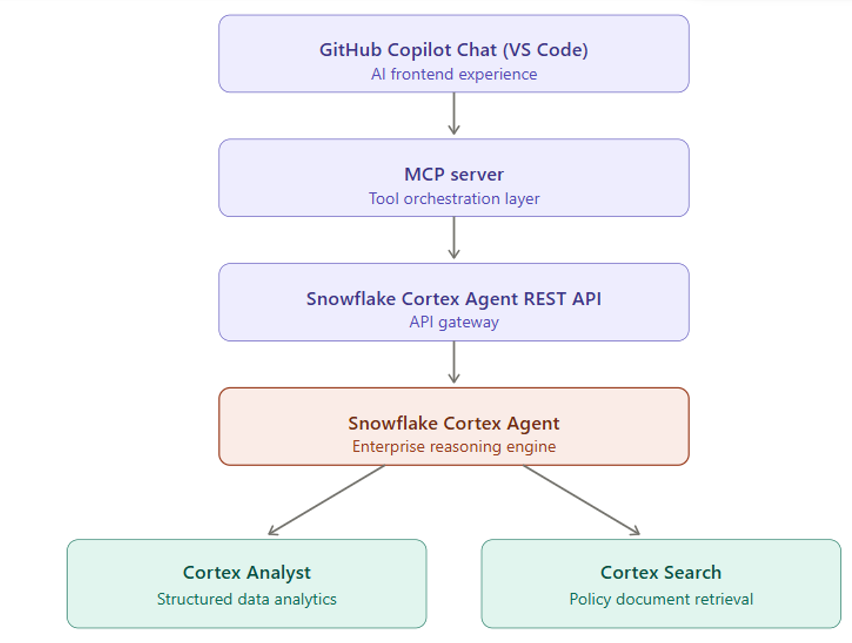
Final Architecture
Our implementation architecture looked like this:
steps
Step 1 — Building the Snowflake Foundation
We first created two datasets.
Structured Claims Table :INSURANCE_CLAIMS
This table contained:
- claim amount
- approval amount
- region
- claim status
- claim type
- policy holder
This dataset powered Cortex Analyst.
Policy Documents Table:POLICY_DOCUMENTS
This table contained:
- policy title
- policy type
- document content
This dataset powered Cortex Search Service.
Step 2 — Creating Cortex Search Service
We created a Cortex Search Service over policy documents.
CREATE CORTEX SEARCH SERVICE POLICY_SEARCH_SERVICE ON CONTENT;
This allowed semantic retrieval over insurance policies.
Now the agents could answer:
- What does policy say about vehicle theft?
Step 3 — Creating Cortex Analyst Semantic View
Next, we created a semantic view using YAML.
The semantic model defined:
- dimensions
- metrics
- facts
- business relationships
This allowed natural-language analytics over claims data.
Now users could ask:
- Which region has highest approved amount?
Step 4 — Creating the Cortex Agents
We then created a Snowflake Cortex Agent combining:
Tool 1 — Cortex Analyst
Used for:
- structured analytics
- metrics
- aggregations
Tool 2 — Cortex Search Service
Used for:
- policy lookup
- coverage rules
- semantic retrieval
The agent orchestration instructions guided:
- when to use Analyst
- when to use Search
- when to combine both
This created intelligent routing inside Snowflake.
MCP Steps
Step 5 — Building the MCP Server to Call Snowflake Cortex Agent REST API
This is the most important part of the implementation. Until this point, we created the Snowflake side:
Cortex Agent
├── Cortex Analyst
└── Cortex Search Service
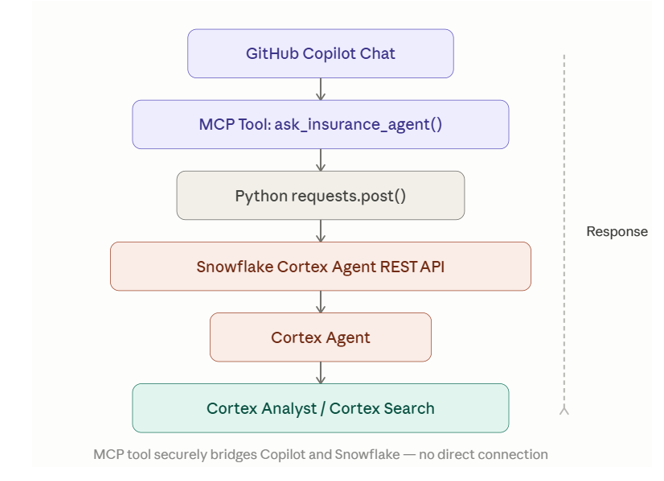
But now we need a bridge so that GitHub Copilot Chat can call this Snowflake Agent. That bridge is the MCP Server.
In our implementation, the MCP server exposes one tool:
ask_insurance_agent(question: str)
When GitHub Copilot Chat calls this tool, the MCP server internally calls the Snowflake Cortex Agent REST API.
The Runtime Flow
Snowflake Cortex Agent REST API Endpoint
The Cortex Agent is called using this REST endpoint pattern:
https://<account>.snowflakecomputing.com/api/v2/databases/<database>/schemas/<schema>/agents/<agent_name>:run
This endpoint means:

Authentication Using PAT
For this demo, we used a Programmatic Access Token.
The PAT was stored in .env:
SNOWFLAKE_ACCOUNT=QBTXZRI-XXXXX
SNOWFLAKE_PAT=YOUR_PAT_HERE
SNOWFLAKE_DATABASE=INSURANCE_AGENT_DB
SNOWFLAKE_SCHEMA=AGENT_SCHEMA
SNOWFLAKE_AGENT=INSURANCE_SMART_AGENT
Request Headers
The REST API call requires headers.
headers = {
“Authorization”: f”Bearer {pat}”,
“X-Snowflake-Authorization-Token-Type”: “PROGRAMMATIC_ACCESS_TOKEN”,
“Content-Type”: “application/json”,
“Accept”: “application/json”
}
Request Payload
The payload tells the Agent what the user asked.
payload = {
“messages”: [
{
“role”: “user”,
“content”: [
{
“type”: “text”,
“text”: question
}
]
}
],
“stream”: False
}
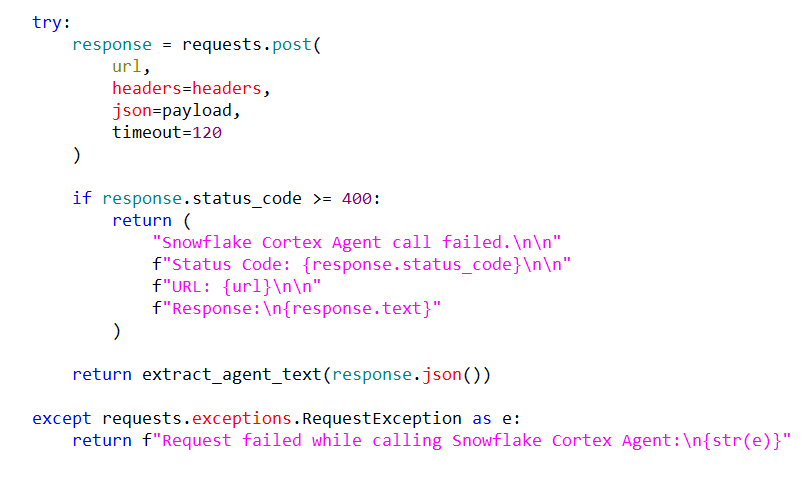
Python REST API Call
The actual API call is:
response = requests.post(
url,
headers=headers,
json=payload,
timeout=120
)
Complete MCP Tool Code
Step 6 — Understanding .vscode/mcp.json
The second most important file is:
.vscode/mcp.json
This file tells VS Code and GitHub Copilot:
- How do I start the MCP server?
- Where is Python?
- Which server.py file should I run?
- Which environment file should I load?
Without this file, Copilot Chat does not know your MCP server exists.
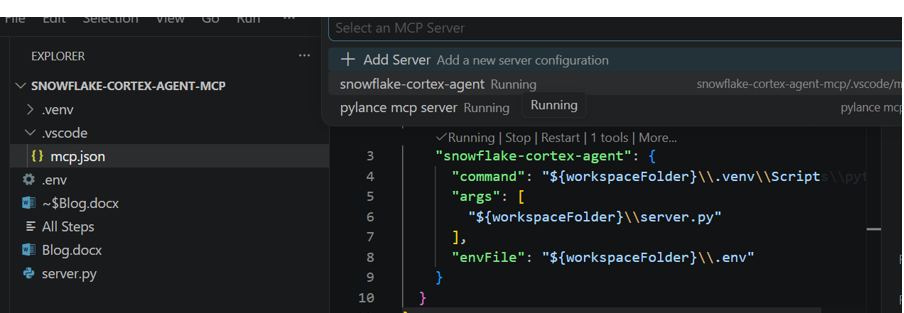
Server name
“snowflake-cortex-agent”: This is the logical name of our MCP server.
This is what VS Code shows when you run:
MCP: List Servers
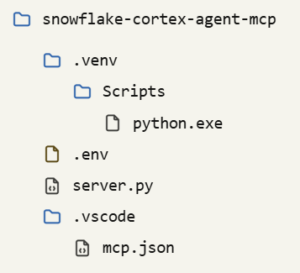
Final Folder Structure
snowflake-cortex-agent-mcp
End-to-End Execution
End-to-End Execution
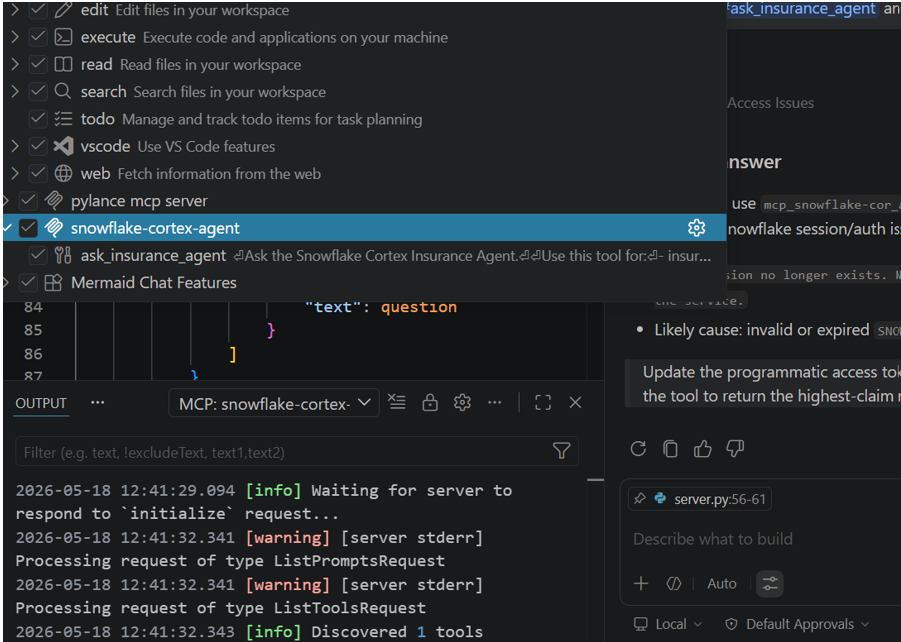
When we start the MCP server from VS Code:
- MCP: Start Server
VS Code reads:
- .vscode/mcp.json
Then executes:
- .venv\Scripts\python.exe server.py
Then server.py starts the MCP server.
Ask the Question in VS Code Chat: